Extremely rare and extremely challenging: a complete Chasmops from glacial erratics

- Details
- Kategorie: English articles
- Veröffentlicht: Freitag, 22. Juli 2022 12:00
- Geschrieben von Paul Freitag
- Zugriffe: 2246
Complete trilobites can rarely be found in the glacial erratics of northern Germany. Only with practice and perseverance you might get lucky. Among the large number of trilobite species, there are some particularly rare ones, from which mostly isolated cranidia or pygidia are found. This includes almost all species of the Chasmopinae. To find a complete representative of this subfamily is therefore considered an absolute top find. In the following I would like to report about the complex and difficult preparation of such a find.
In 2019, Jan Deppermann succeeded in finding a complete Chasmopinae from a glacial erratic. Chasmopinae are generally considered to be very difficult to prepare, as they are usually found in very hard limestones and the separation of the rock from the shell is almost always very poor. Only in slightly weathered limestones of the Macrourus-type the preparation can be a bit easier. For this reason, Jan Deppermann entrusted me with the trilobite for further preparation.
First, I took a closer look at the rock, which looks very much like Ludibundus-type limestone. As the stone is much brighter and harder than usual though, the assignment to the Ludibundus-type Limestone is not a certainty. The trilobite was found by hitting the rock with a hammer and causing a cross-section (Fig. 1).
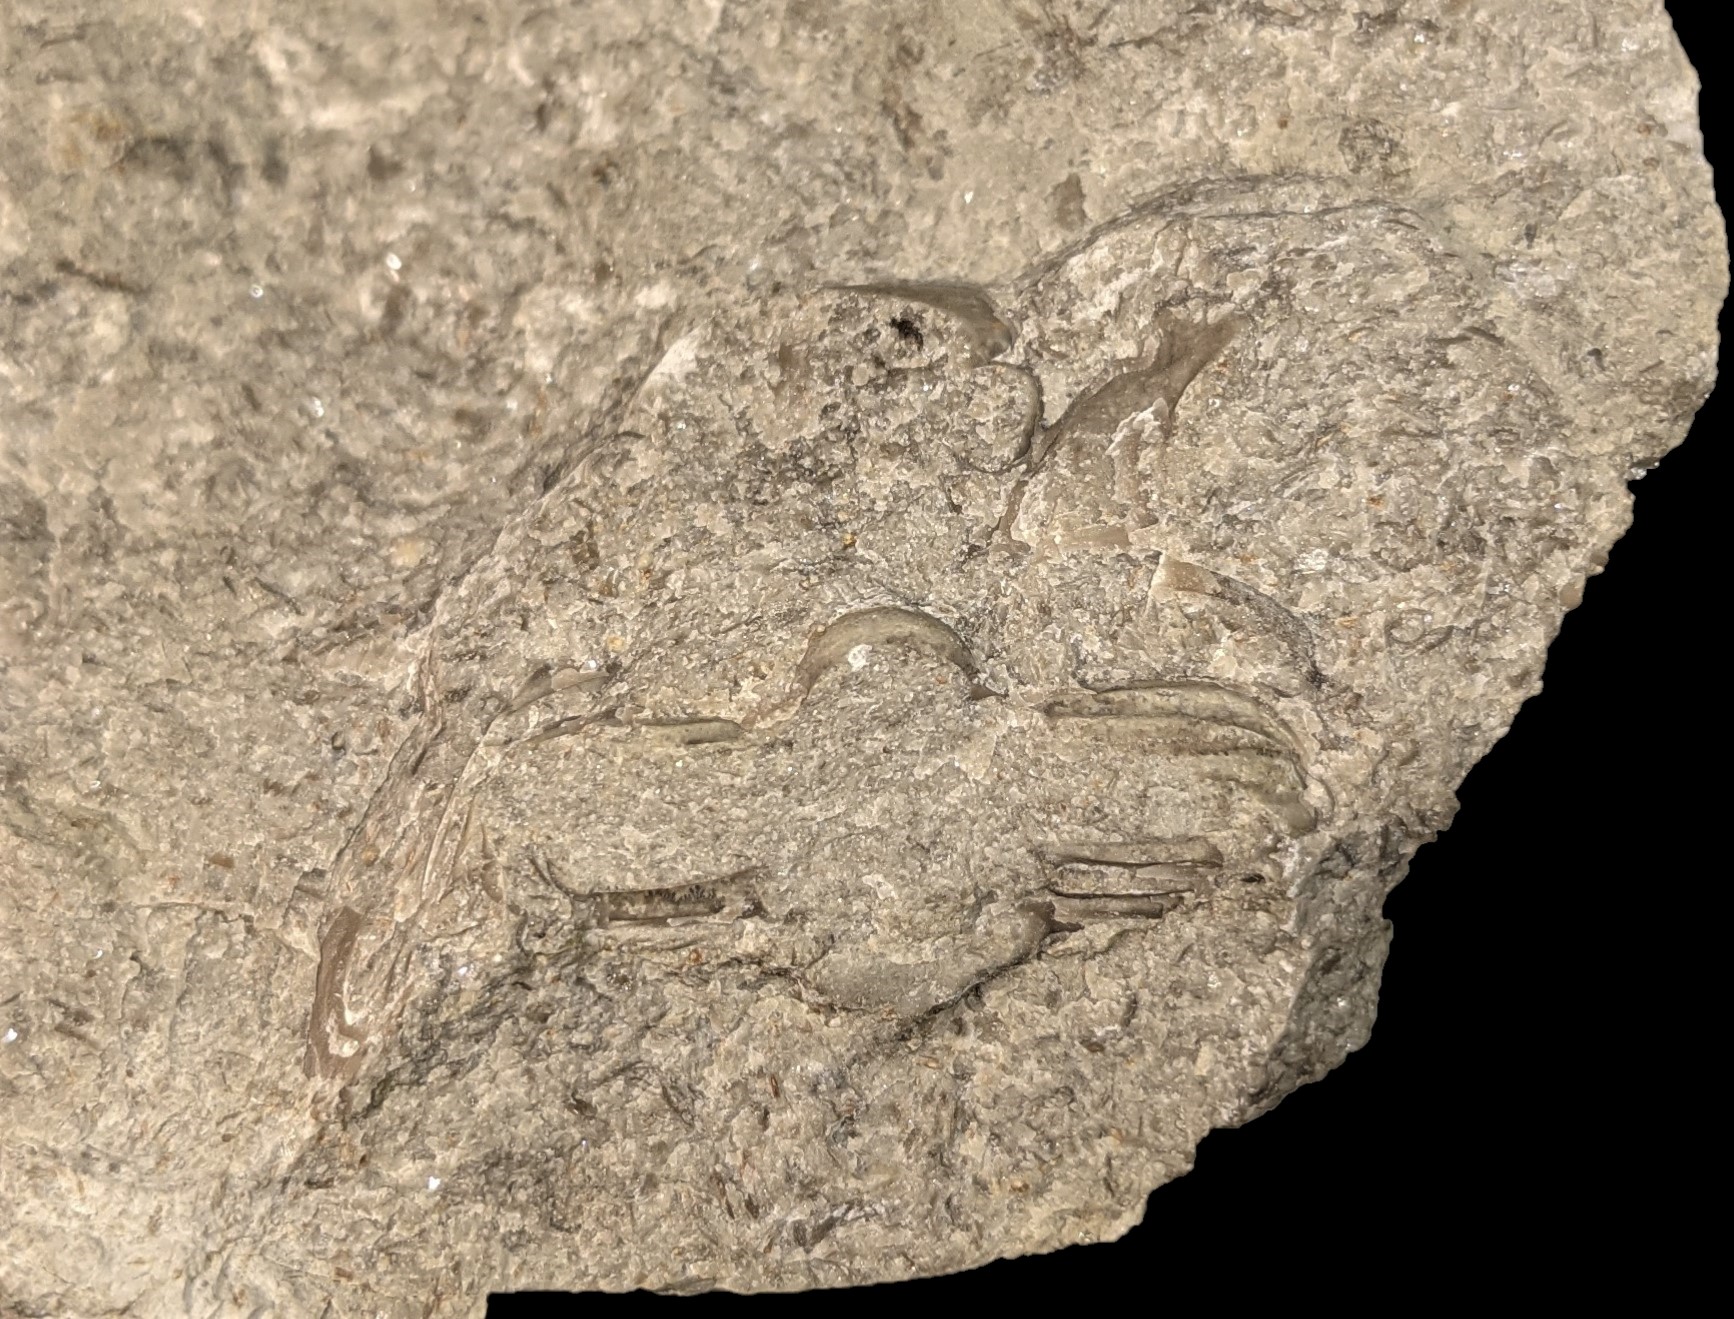
Fig. 1: The rolled up Chasmops in the cross section. Enlarge photo.
The cephalon with the right eye and both spines of the librigenae were well recognizable. Furthermore at least 5 pleurae were visible and the thorax was more or less rolled. All in all, a very good starting position. However, I was only cautiously optimistic at this point. In the past I had prepared several Chasmopinae and also other trilobites from erratics, which seemed to be complete from the initial state. Quite a few turned out to be incomplete. The experience taught me to only rely on what was actually visible. The first step was to determine whether the trilobite was complete or not. To do so you need to check whether the pygidium is present, which should appear deeper in the rock below the pleurae (Fig. 2).
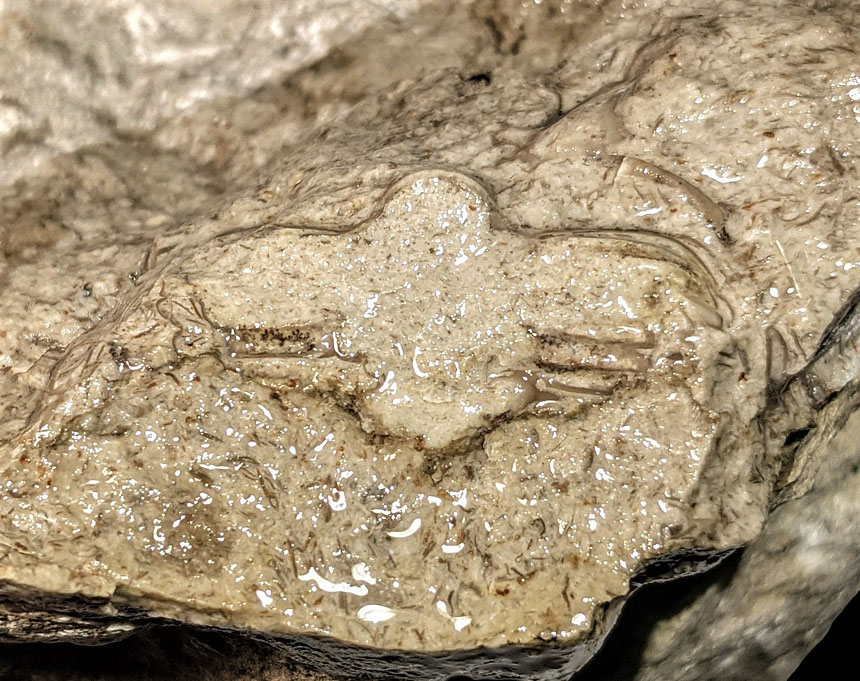
Fig. 2: In moistened state the shell can be seen a little better. In the lower half of the picture the pygidium should be hidden.
I therefore started to follow the pleurae on the right side of the rhachis towards the pygidium. Fortunately, the first excavated pleurae are close to each other (Fig. 3).
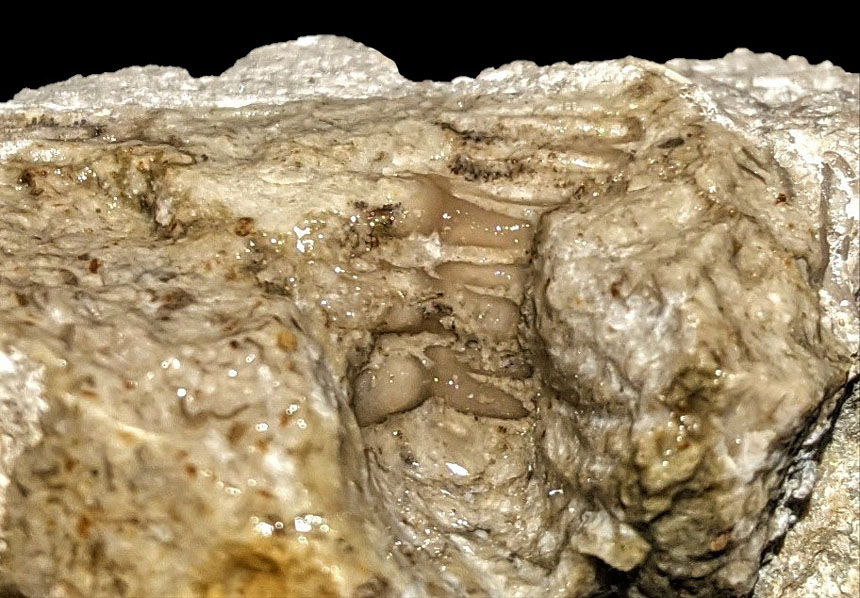
Fig. 3: After the first hour of preparation, two more pleurae have already appeared, a good sign!
Accordingly, I continued more motivated. As expected, the rock stuck stubbornly to the shell. Much worse, however, was that the shell was extremely brittle and reacted sensitively to mechanical stress. For this reason, the overlying rock was very slowly and carefully pried away to cause as little vibration as possible. In the later course of the preparation, the rock had to be almost exclusively removed with various grinding tools. The last 1-2 millimeters of rock above the shell could be exposed with a little luck using a fine airscribe or had to be completely blasted at low pressure using fine air abrasives. Although, even at the beginning of the preparation, progress was slow, but the first exposed pleurae showed a well-preserved shell (Fig. 4).
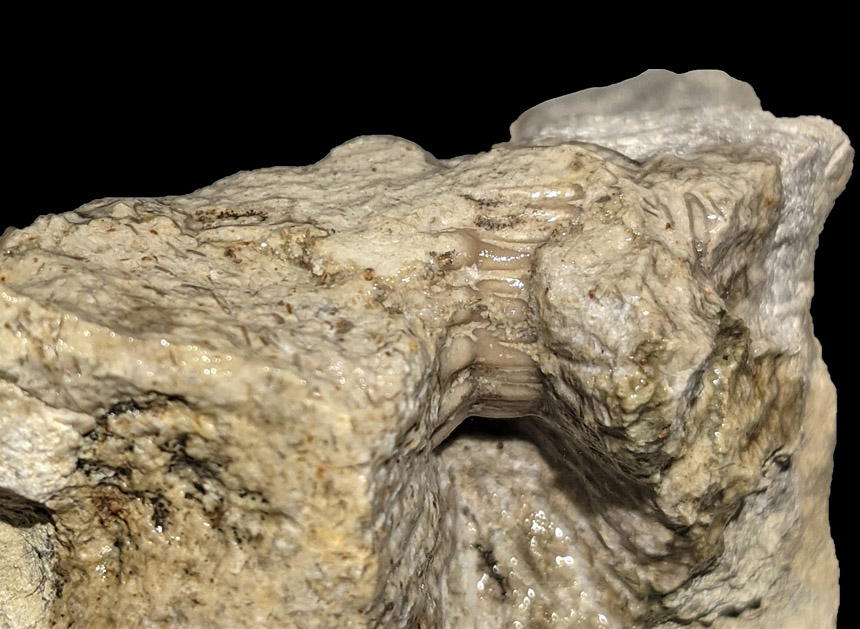
Fig. 4: The digging continues towards the pygidium.
Shortly after the last pleura, the hoped-for relief came: the pygidium was present and the Chasmops should thus be complete (Fig. 5)!
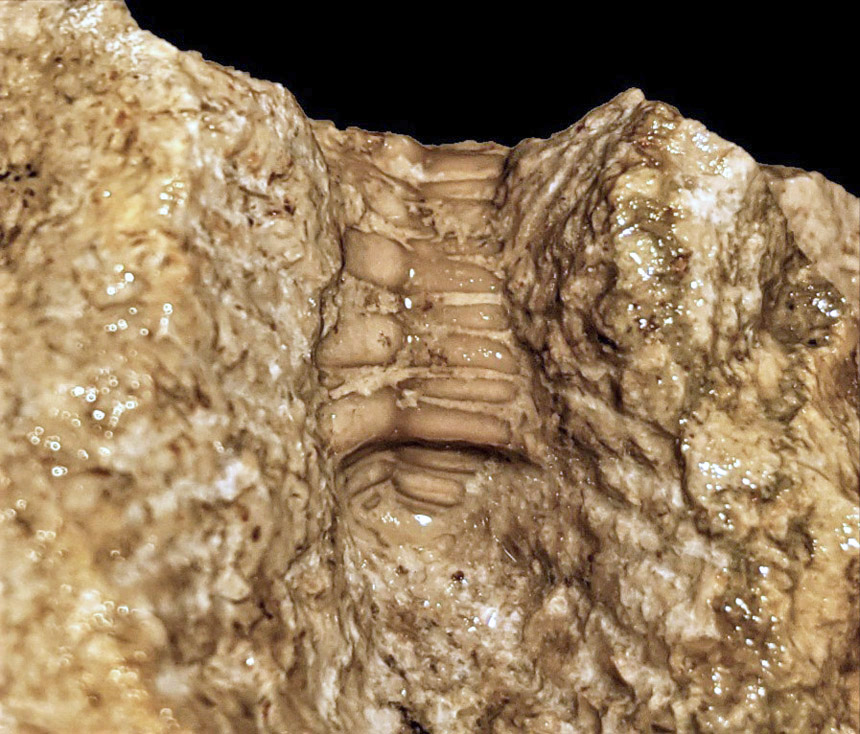
Fig. 5: The pygidium is preserved!
The next step was to create a window on the right side of the head, which would provide orientation after gluing. The shell shows its best side here, even if every millimeter has to be fought hard for (Fig. 6).
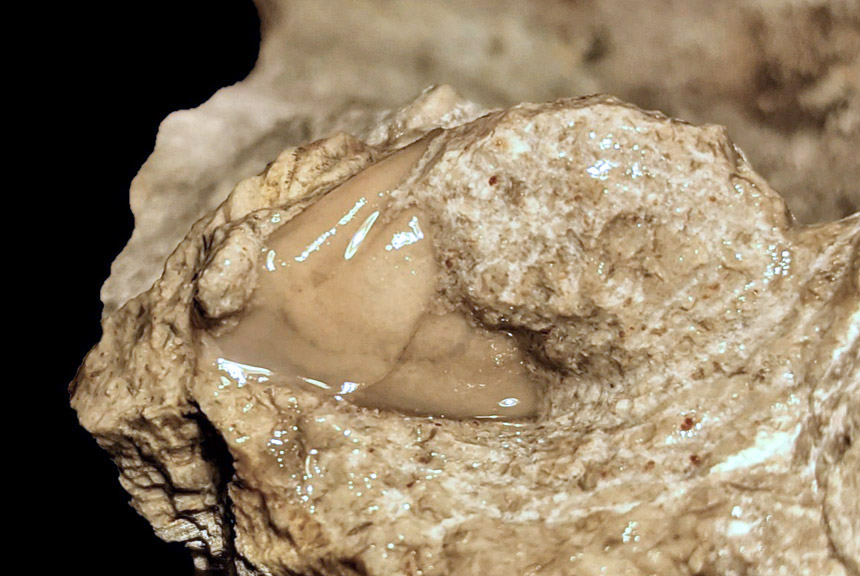
Fig. 6: Prepared area on the right side of the head.
Before cutting out the counterpart, both halves were held against each other several times. In this way, a three-dimensional image develops in the mind, which helps in estimating the dimensions of the trilobite in the rock. Little would be more tragic than cutting right through the fossil.
A small part was missing between the two halves (Fig. 7).
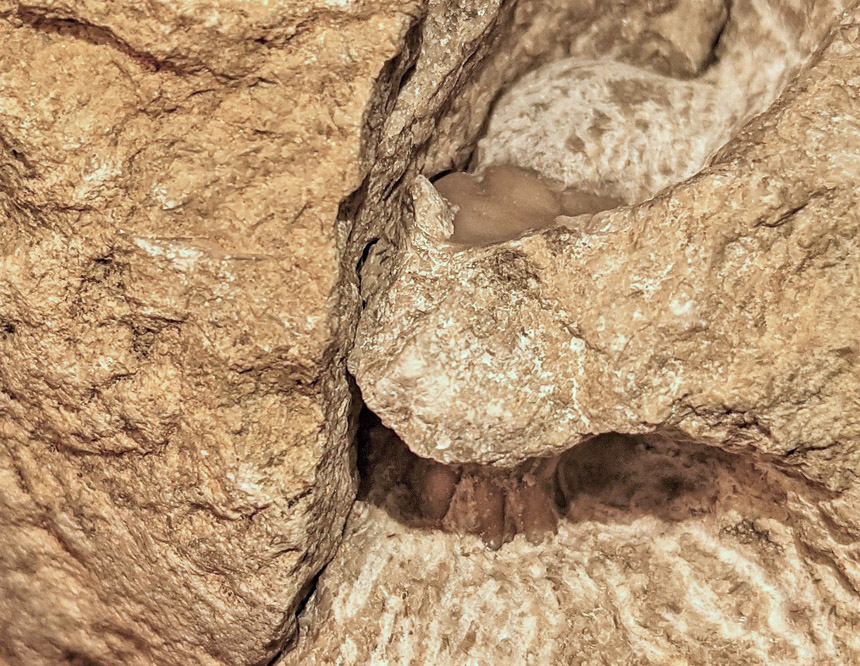
Fig. 7: The two halves of the stone placed together reveal the gap in the right spine - which also protrudes out of the rock a bit further.
This was apparent from the start and should not cause any major difficulties. However, since there was a gap in the right spine, this had to be filled in during gluing so that the spine, which continues in the other half of the stone, would be held in the correct position. Unfortunately, it could already be seen that the tip of the spine protruded out of the rock. If only the trilobite would lie one centimeter deeper in the rock... but that's the way it is dealing with erratics. The rocks were rounded by the glaciers movements regardless of the fossils. The left spine was not visible from the outside.
After marking the fossil on the counterpart with a pen, the stone was ready for the wet-saw. The other piece of rock was also cut (Fig. 8).
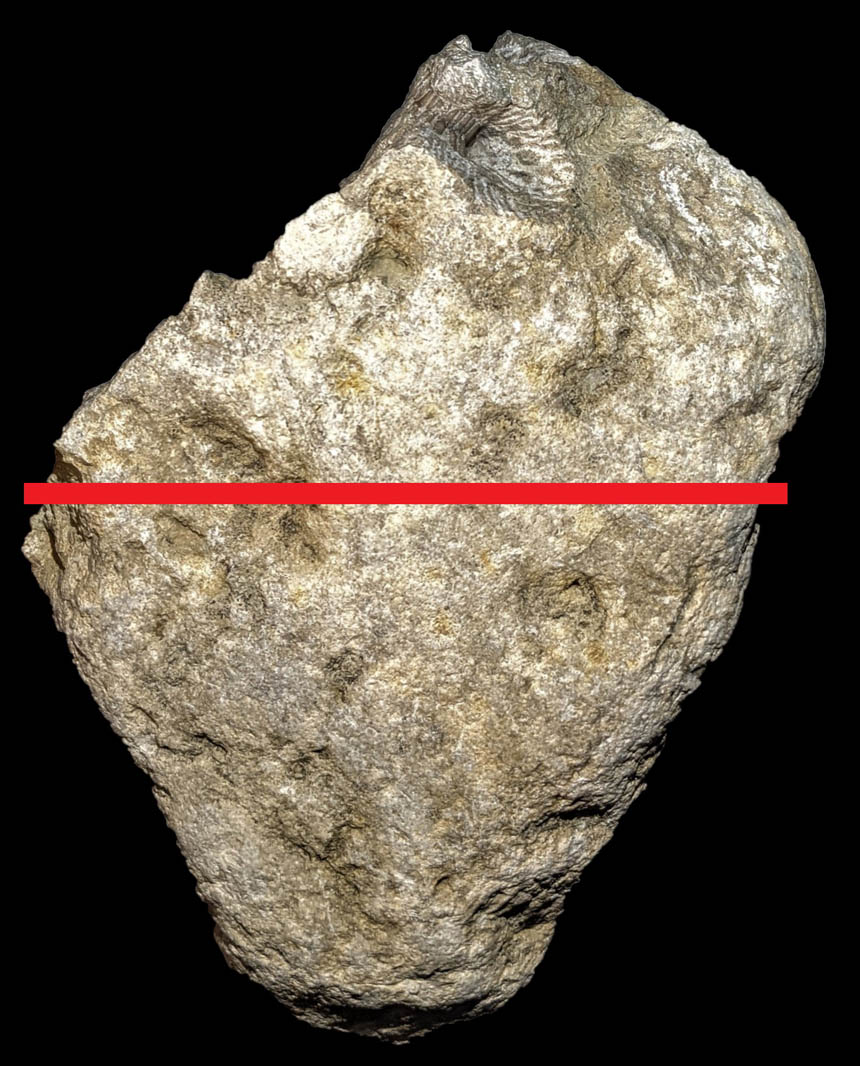
Fig. 8: The stone is cut along the marked line.
Cutting the stone this way, a base was created for the specimen and excess rock was removed. Usually I am very fond of large and preferably natural looking stones, but in this case the ratio of rock to fossil was anything but appealing. You can often avoid artificial cut lines by selectively hitting the rock with a hammer, and I favor this technique whenever possible. In this case, however, the risk of damaging the trilobite was clearly too high, so I opted for a clean cut.
Now the trilobite could be glued. As already mentioned the gap in the area of the right spine was filled. The colored epoxy resin used for this purpose can later be ground into shape and thus serve as a reconstruction of the lost piece. Thin super glue was used for the remaining gluing surface to ensure a precise fit. Any missing areas along the fracture lines can be filled later.
Once the glue had hardened, the preparation could continue on the cephalon (Fig. 9).
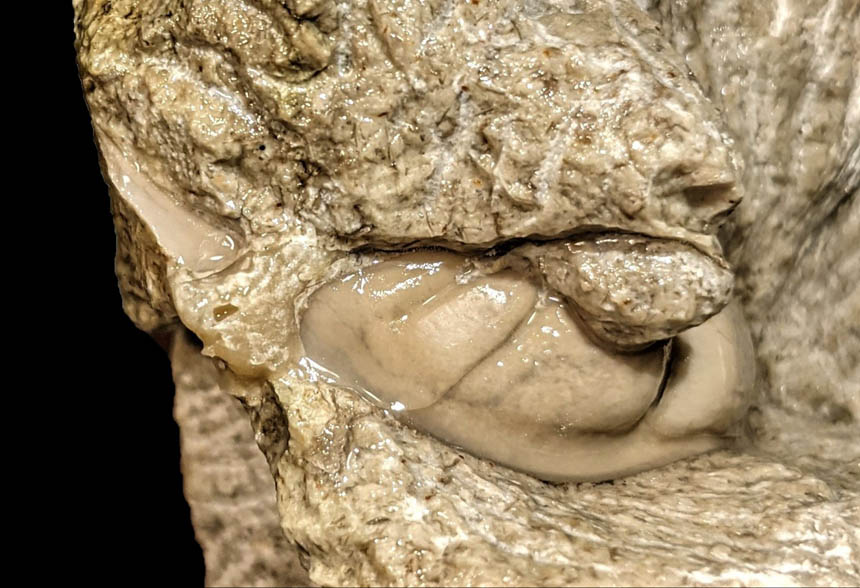
Fig. 9: After gluing, the cephalon is further exposed.
I slowly worked my way around the eye and followed the seam toward the glabella. As expected, the work along the fracture line was complicated by hairline cracks that made the shell even more unstable. All in all however, good progress was made. The feared smaller flaws along the fracture appeared, but these could be filled later in the process (Fig. 10).
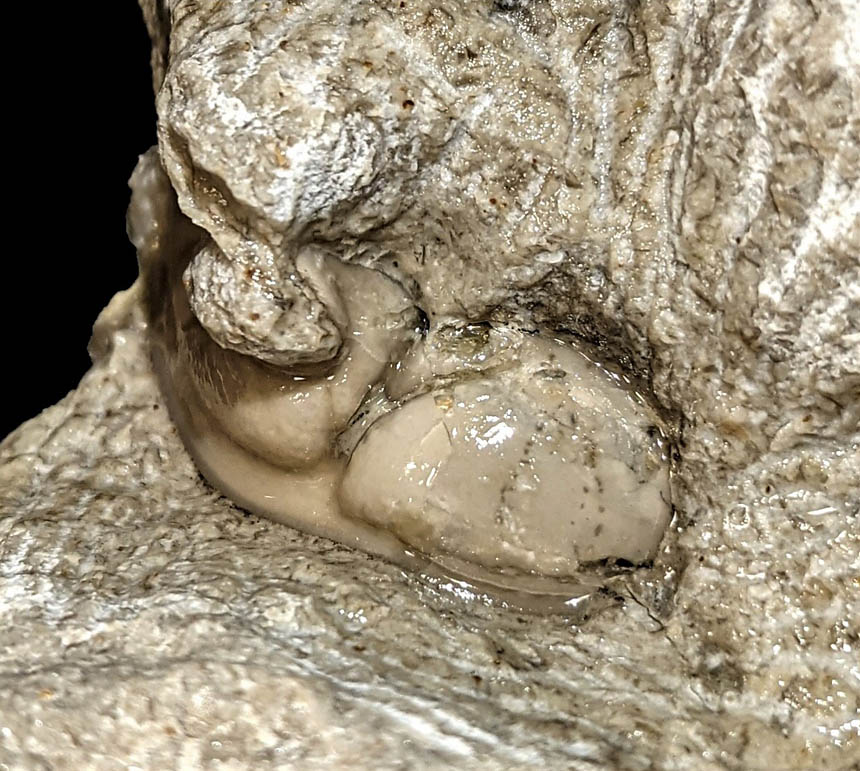
Fig. 10: View of the glabella with minor missing parts in the area of the crack.
I slowly continued towards the back of the cephalon. It was important to locate the eyes here, as they can sometimes be very big in Chasmopinae. At this point we did not know for sure which species we were dealing with so caution was important. The right eye was carefully avoided and the left eye lid was exposed (Fig. 11).
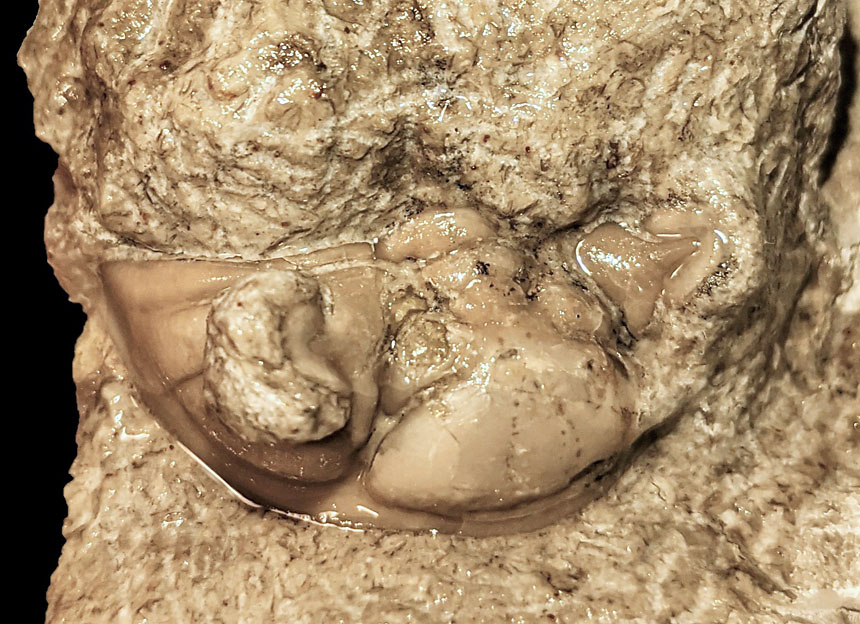
Fig. 11: Both eye lids were located and exposed.
Before exposing the middle part of the carapace, the left spine had to be located. However, just behind the left eye it suddenly stopped. The spine was not located where it should have been (Fig. 12), although it was clearly visible in the cross section (compare Fig. 1).
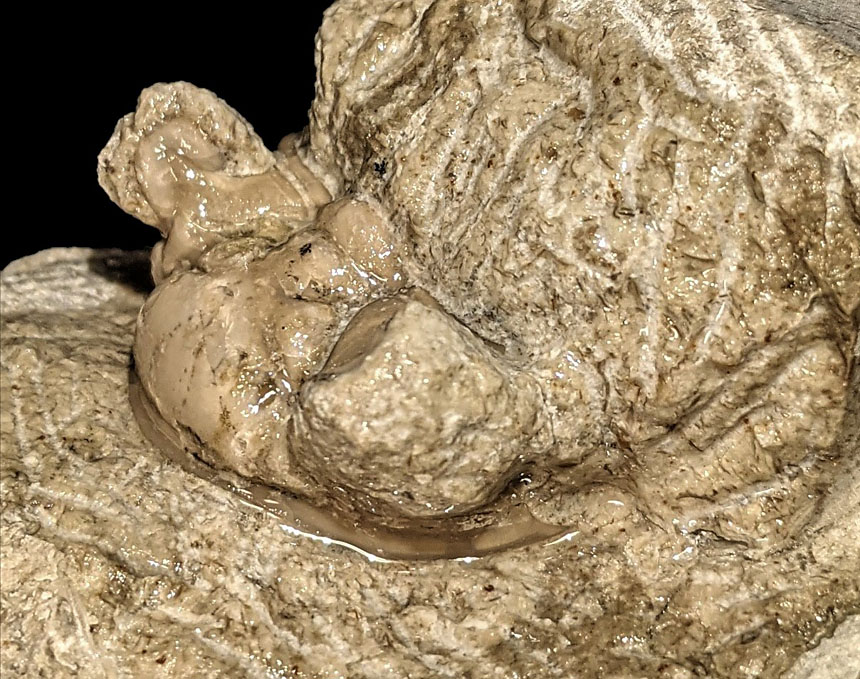
Fig. 12: Where is the left cheek spine?
The only explanation for this is that the spine was embedded somewhat displaced. So, it was necessary to dig carefully - and after half a centimeter the missing piece fortunately appeared. The orientation of the spine in the cross section was not easily discerned: it extends deep downwards and the tip unfortunately protrudes out of the rock as well (Fig. 13).
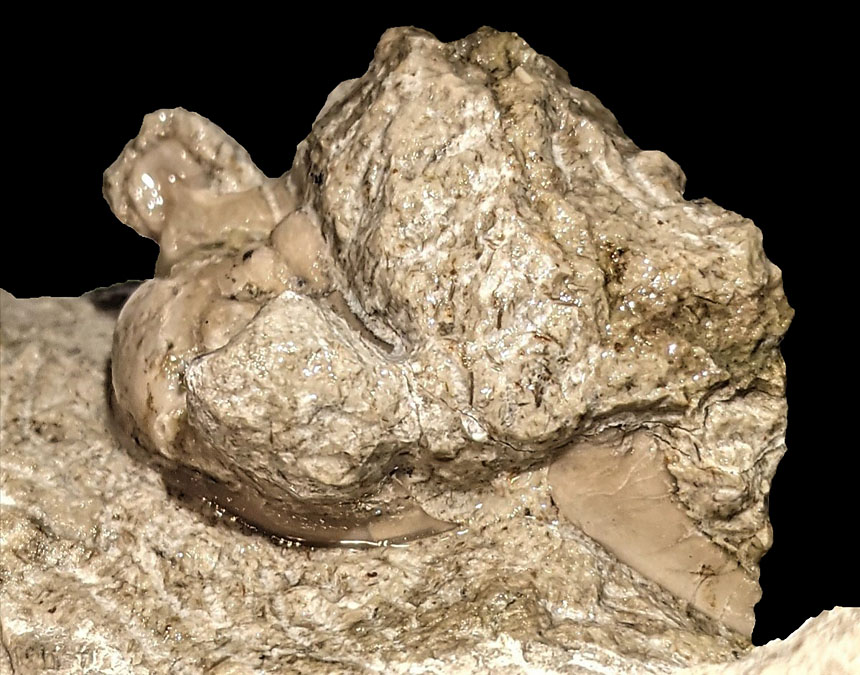
Fig. 13: Shifted, but present: the left spine was found - its tip protruding out of the rock as well.
Next some of the surrounding material was removed to allow for more room to move during the preparation. At this point I also focused on the design of the piece. The trilobite is positioned on the display side at the highest point next to the approximate center, creating a balance of rock, free space and fossil (Fig. 14).
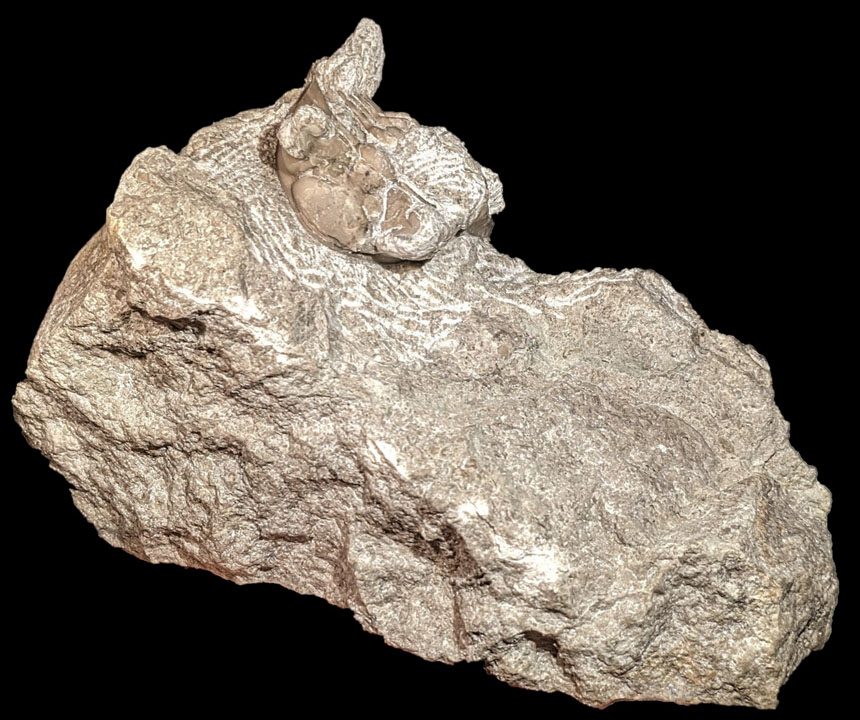
Fig. 14: After rough formatting of the piece, the later appearance can already be guessed!
The exposure of the pleurae is done very carefully and painstakingly slow, as already described above, but there is progress (Fig. 15)!
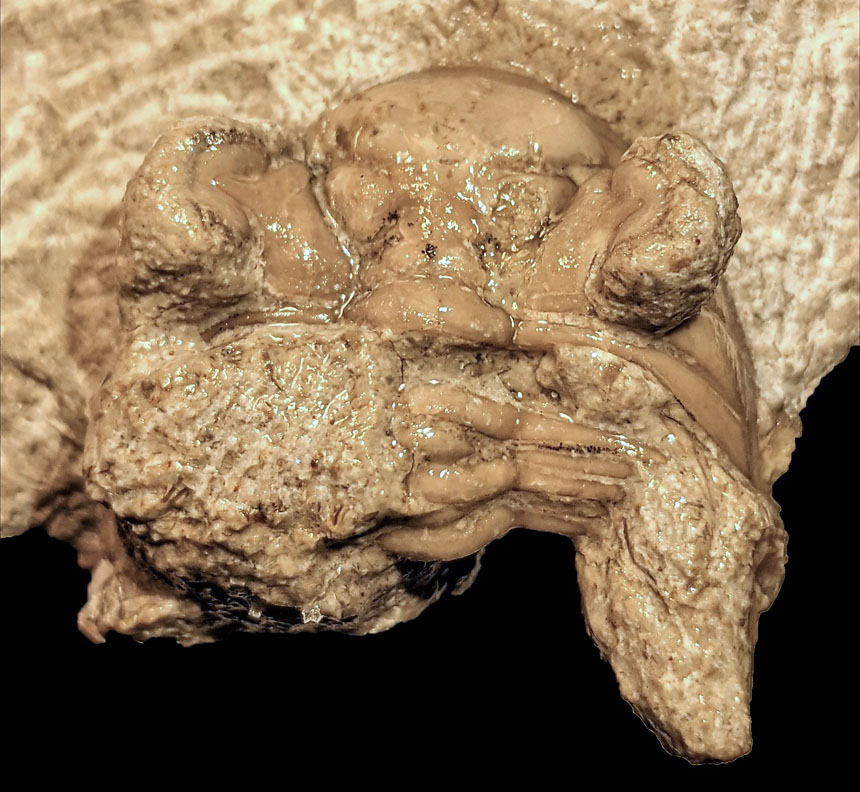
Fig. 15: Continuing at the thorax.
In the middle of the thorax the preservation unfortunately weakens. Some parts of the shell are heavily dissolved, which is absolutely no help for the preparation. Furthermore, the shell becomes extremely thin at the pygidium. In parts it is even translucent and allows a view at the texture of the underlying matrix when moistened (Fig. 16).

Fig. 16: The mid-section seems to be somewhat dissolved. The shell is extremely thin.
Further exposure takes place without any nasty surprises and the carapace becomes more and more visible (Fig. 17-19).
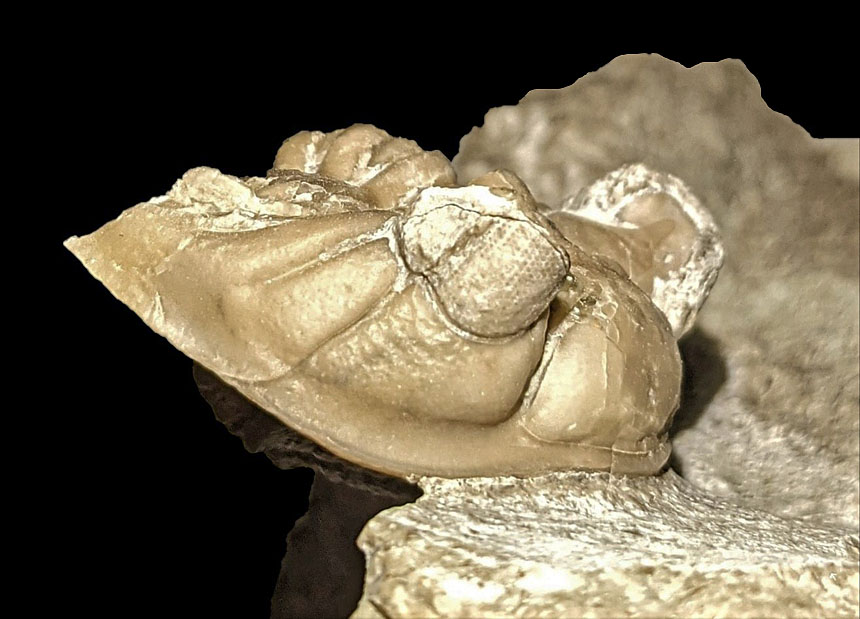
Fig. 17: The eyes are somewhat better preserved - the lenses are clearly visible.
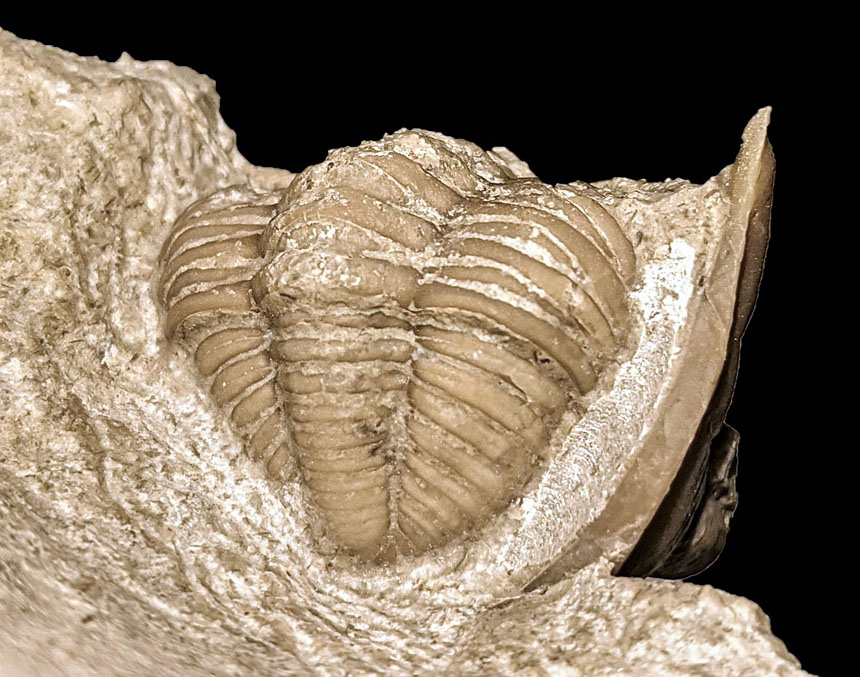
Fig. 18: The pygidium lies relatively far sunken into the cephalon. There must be enough matrix left here for the trilobite to sit securely on the rock.
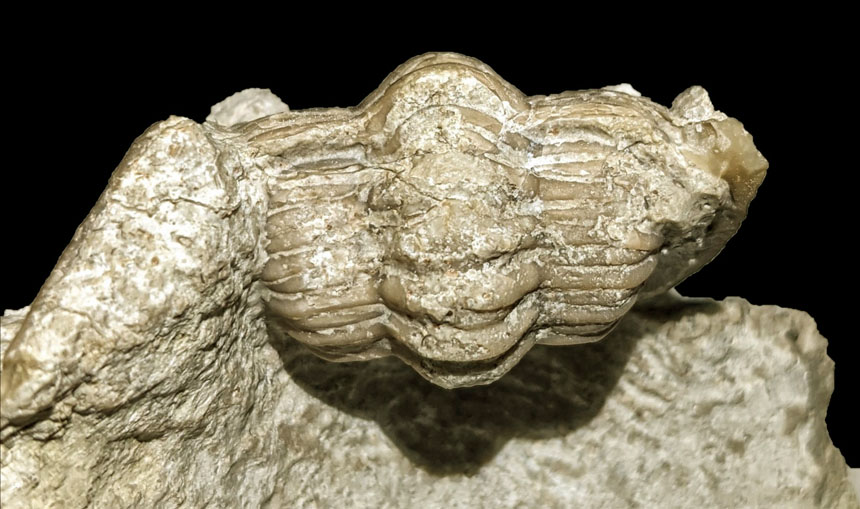
Fig. 19: Altogether 5 pleurae are more or less partly dissolved. However, the basic substance is predominantly good!
Meanwhile, at the left edge of the pygidium, only grinding and blasting is performed. Here the matrix is slowly thinning as the left inner margin of the cranidium lies on the other side. The space between the cephalon and pygidium is therefore not completely exposed on the left half. Here a thin "rock bridge" must remain, through which the trilobite sits securely on the matrix (Fig. 20).
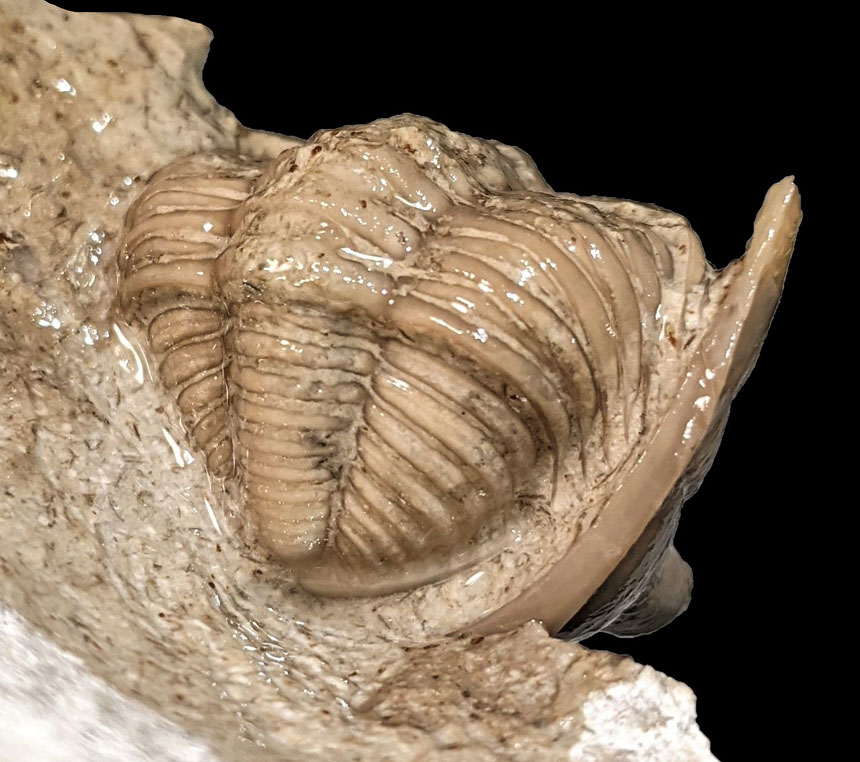
Fig. 20: The posterior margin of the pygidium has been reached. At some places the shell is so thin that the matrix underneath is clearly visible when moistened.
At this point I had another intensive discussion with Jan. His wish was to reconstruct the missing spine tips (which protruded out of the stone). Since the slightly disarticulated and angled left spine prevents the characteristic image of free spines in the air while the thorax is rolled up, this should be "rearticulated" again. This is a question of personal taste. The trilobite could also have been completed without any reconstructive work.
Since the left spine was shifted quite a bit, it was relatively easy to remove and reinsert it in its original position (Figs. 21 and 22).
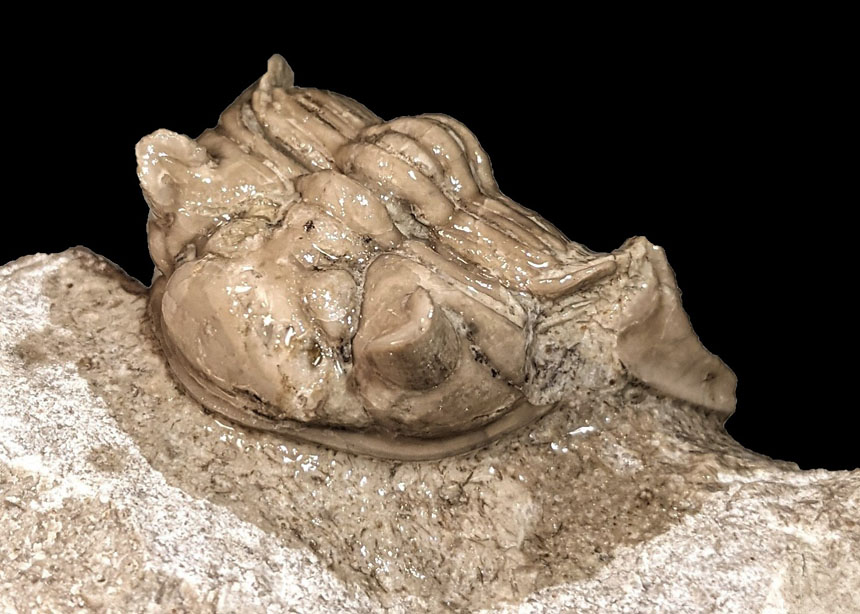
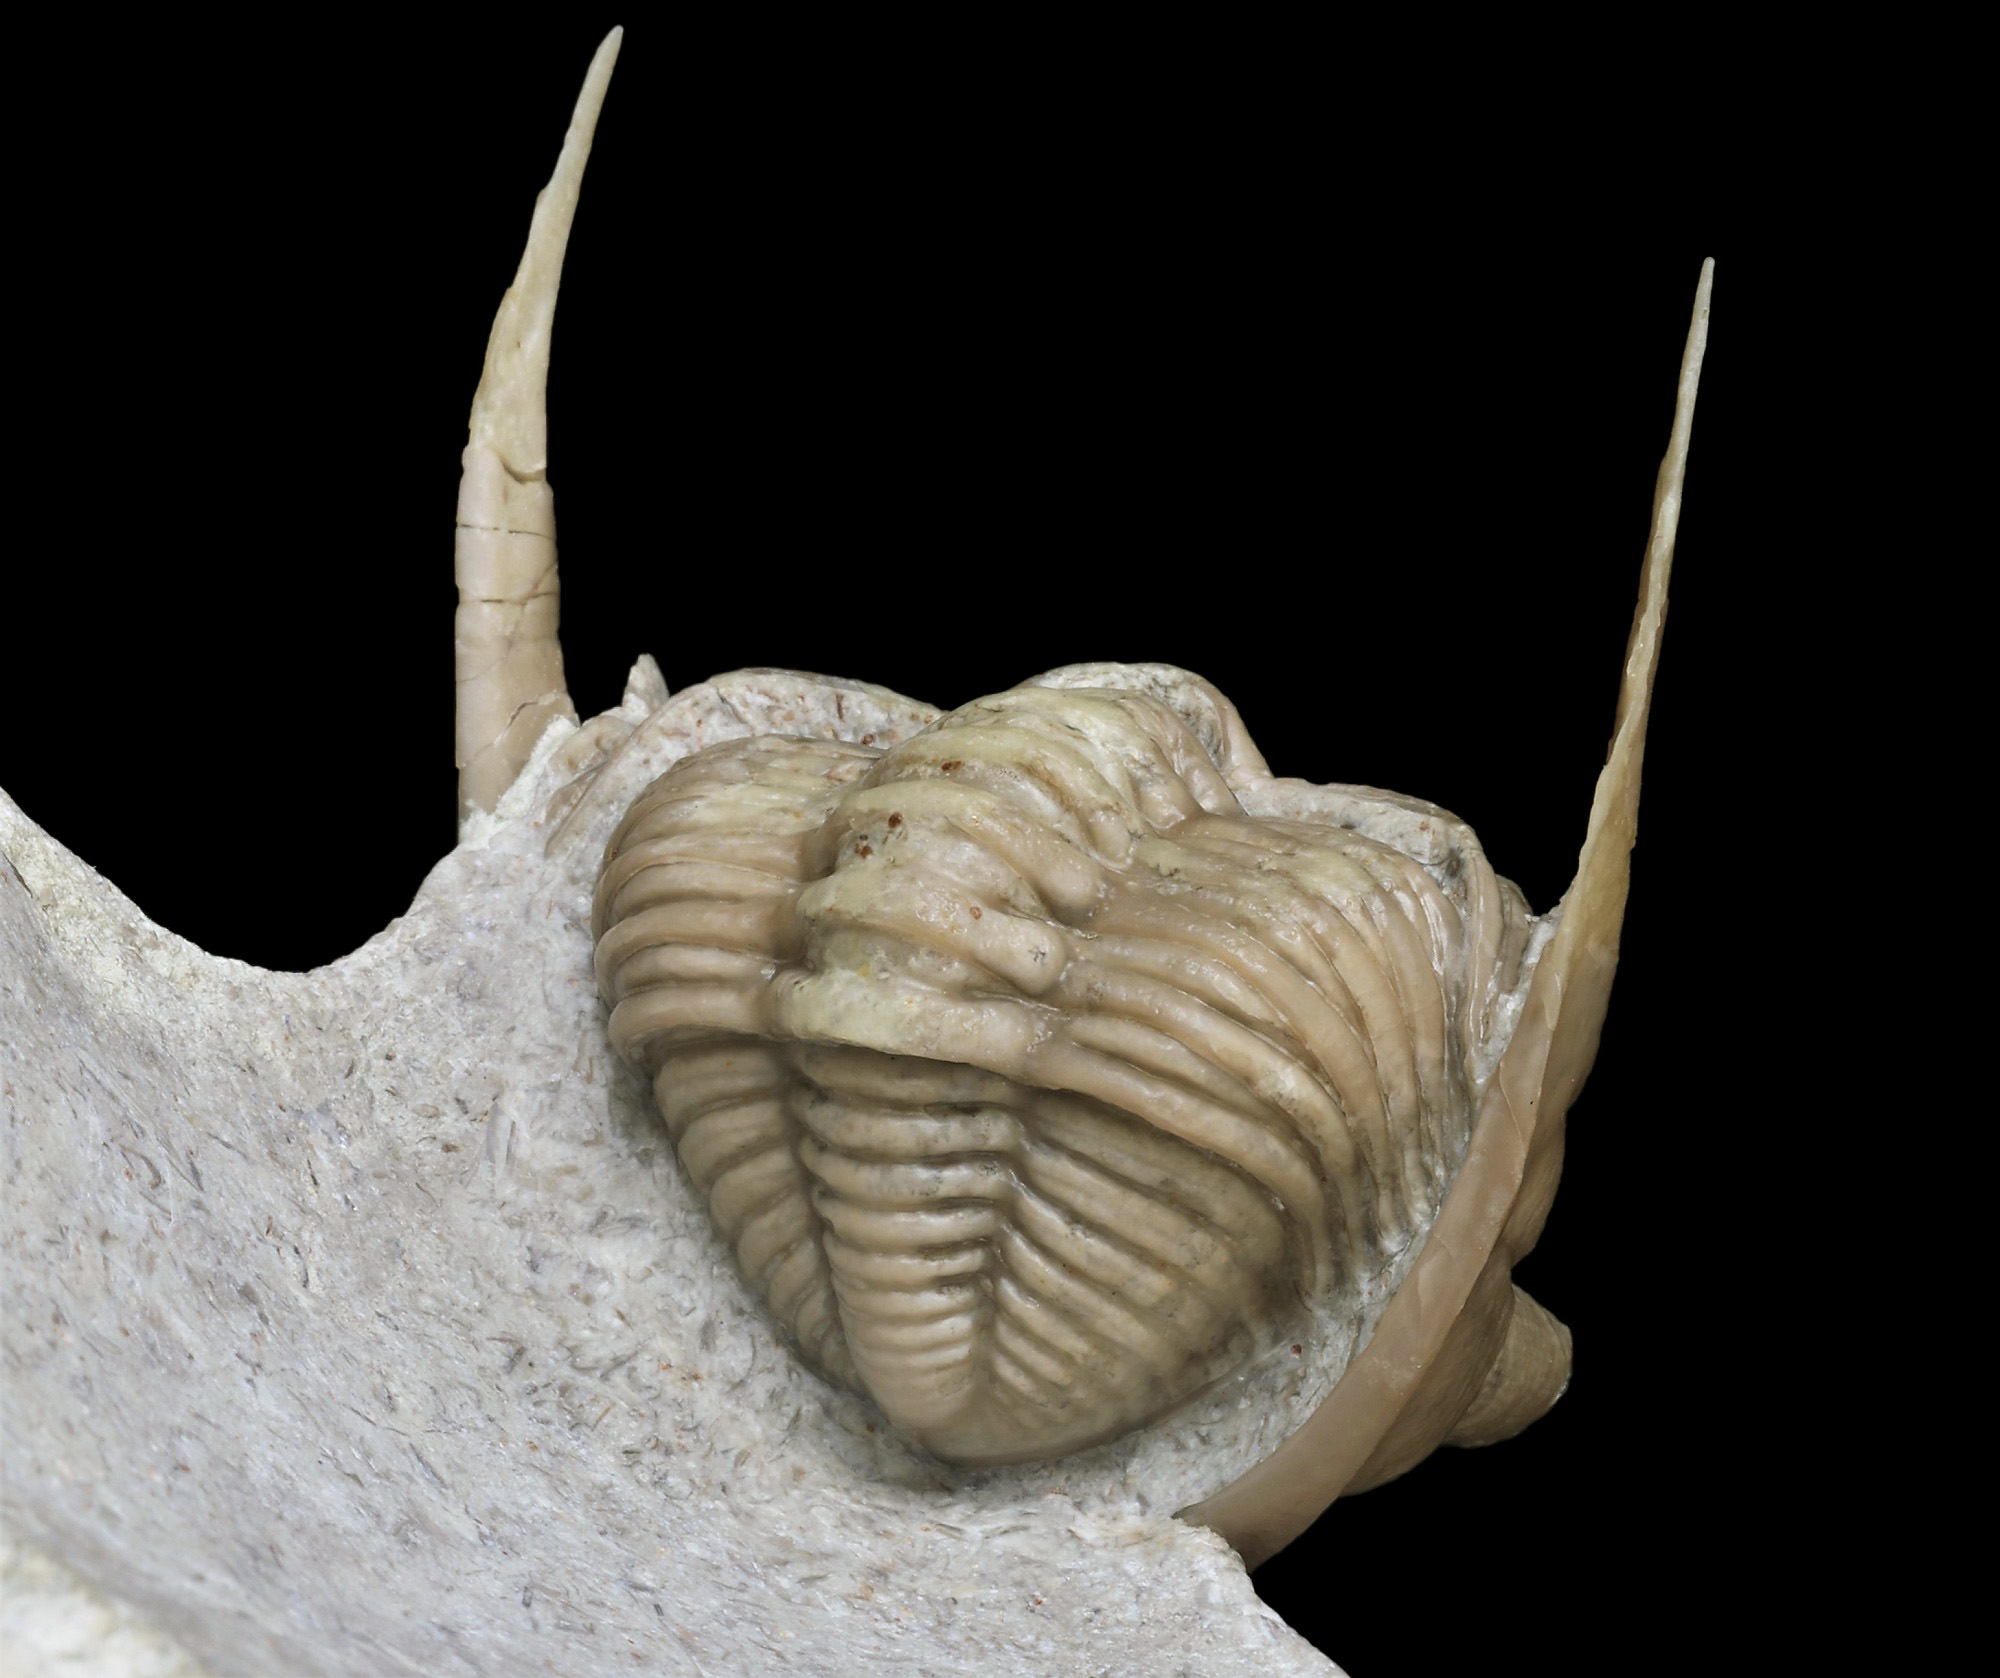
Fig. 21: The Chasmops is almost finished - before rearticulation of the left spine...
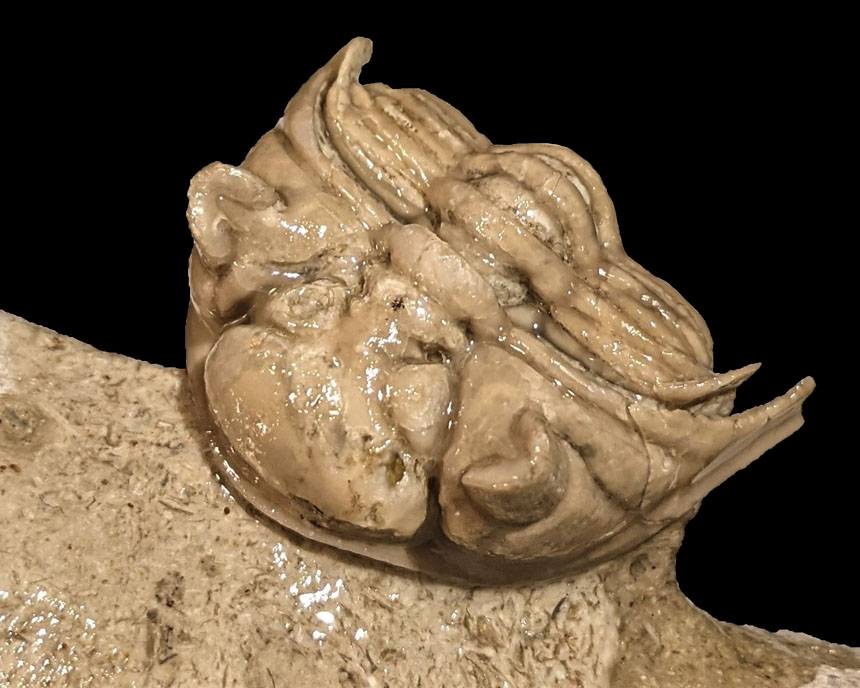
Fig. 22: ... and after rearticulation and fine preparation.
The partly dissolved areas of the pleurae were also restored in this process (Fig. 23 and 24).
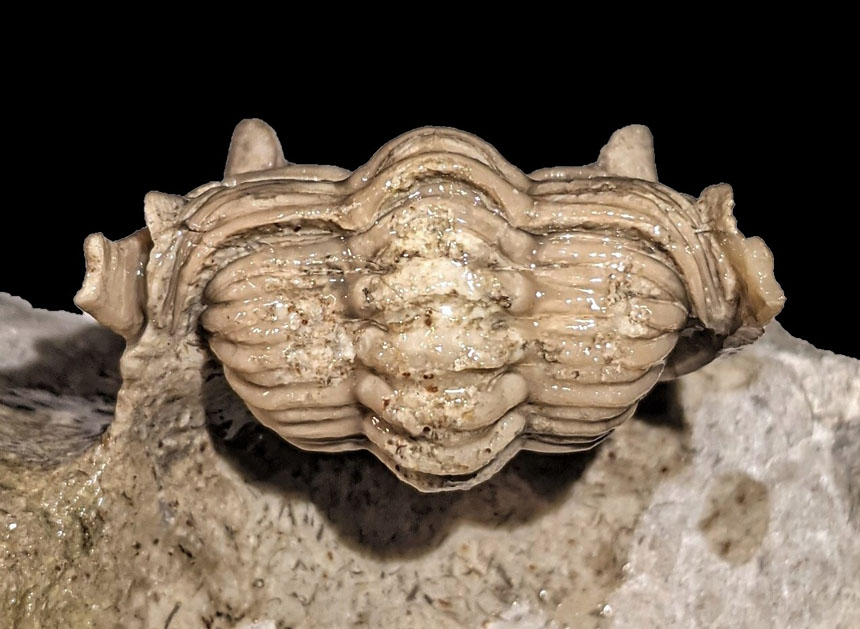
Fig. 23: View of the rhachis before restorative work.
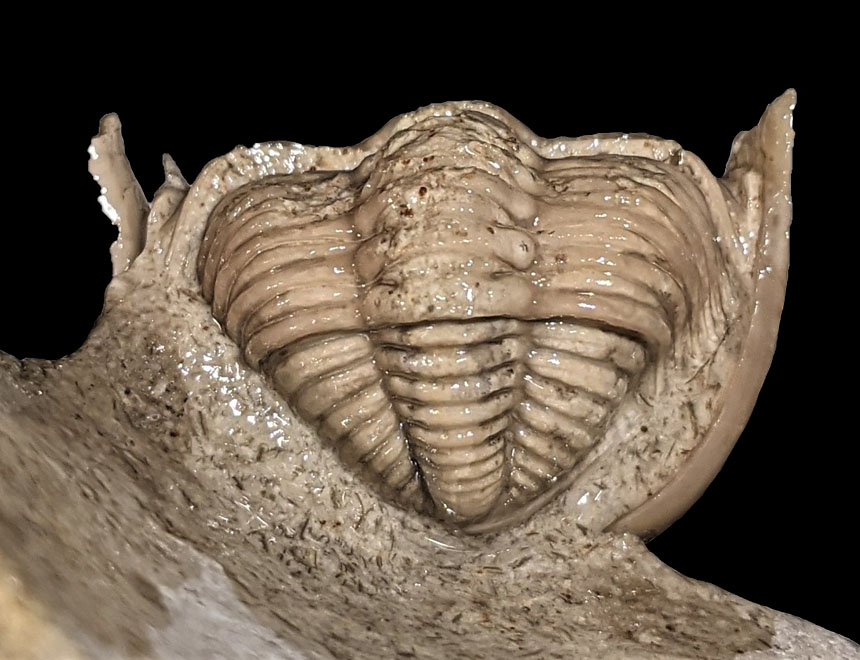
Fig. 24: View of the pygidium, which was exposed as much as possible without compromising the stability of the trilobite on the matrix.
With the modeling of the spine tips the last step of work on this rare trilobite ended, which could finally be completed after almost 60 hours of work (Fig. 25-30).
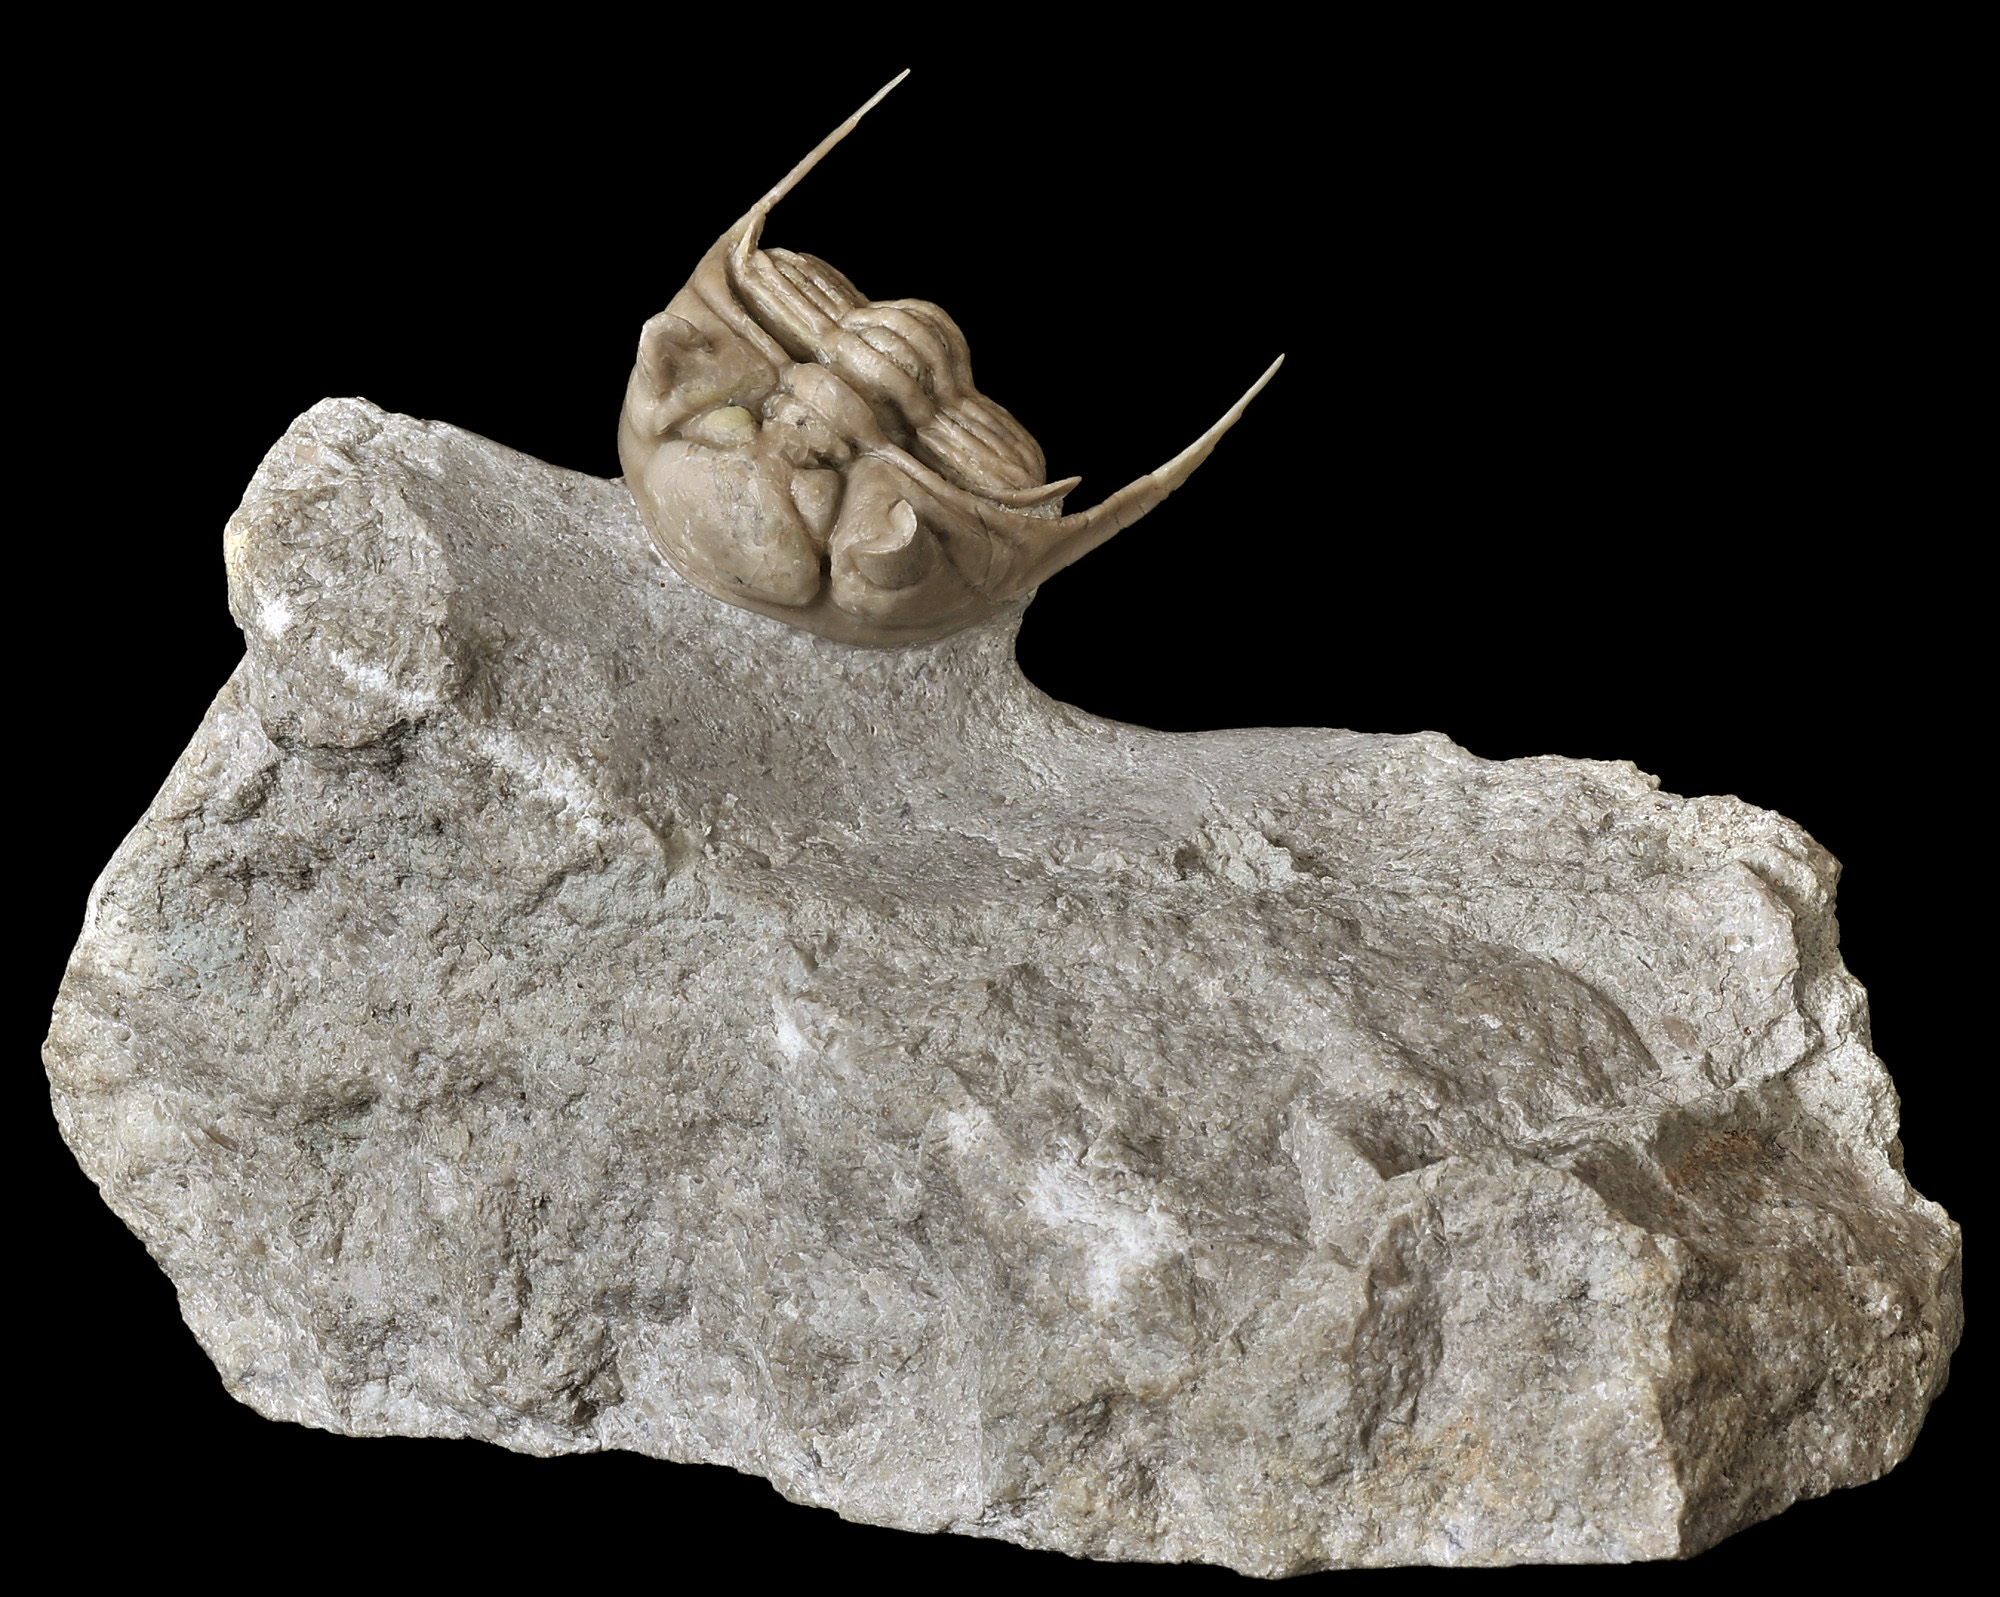
Fig. 25: The finished specimen after all restoration and reconstructive work was completed. Enlarge photo.
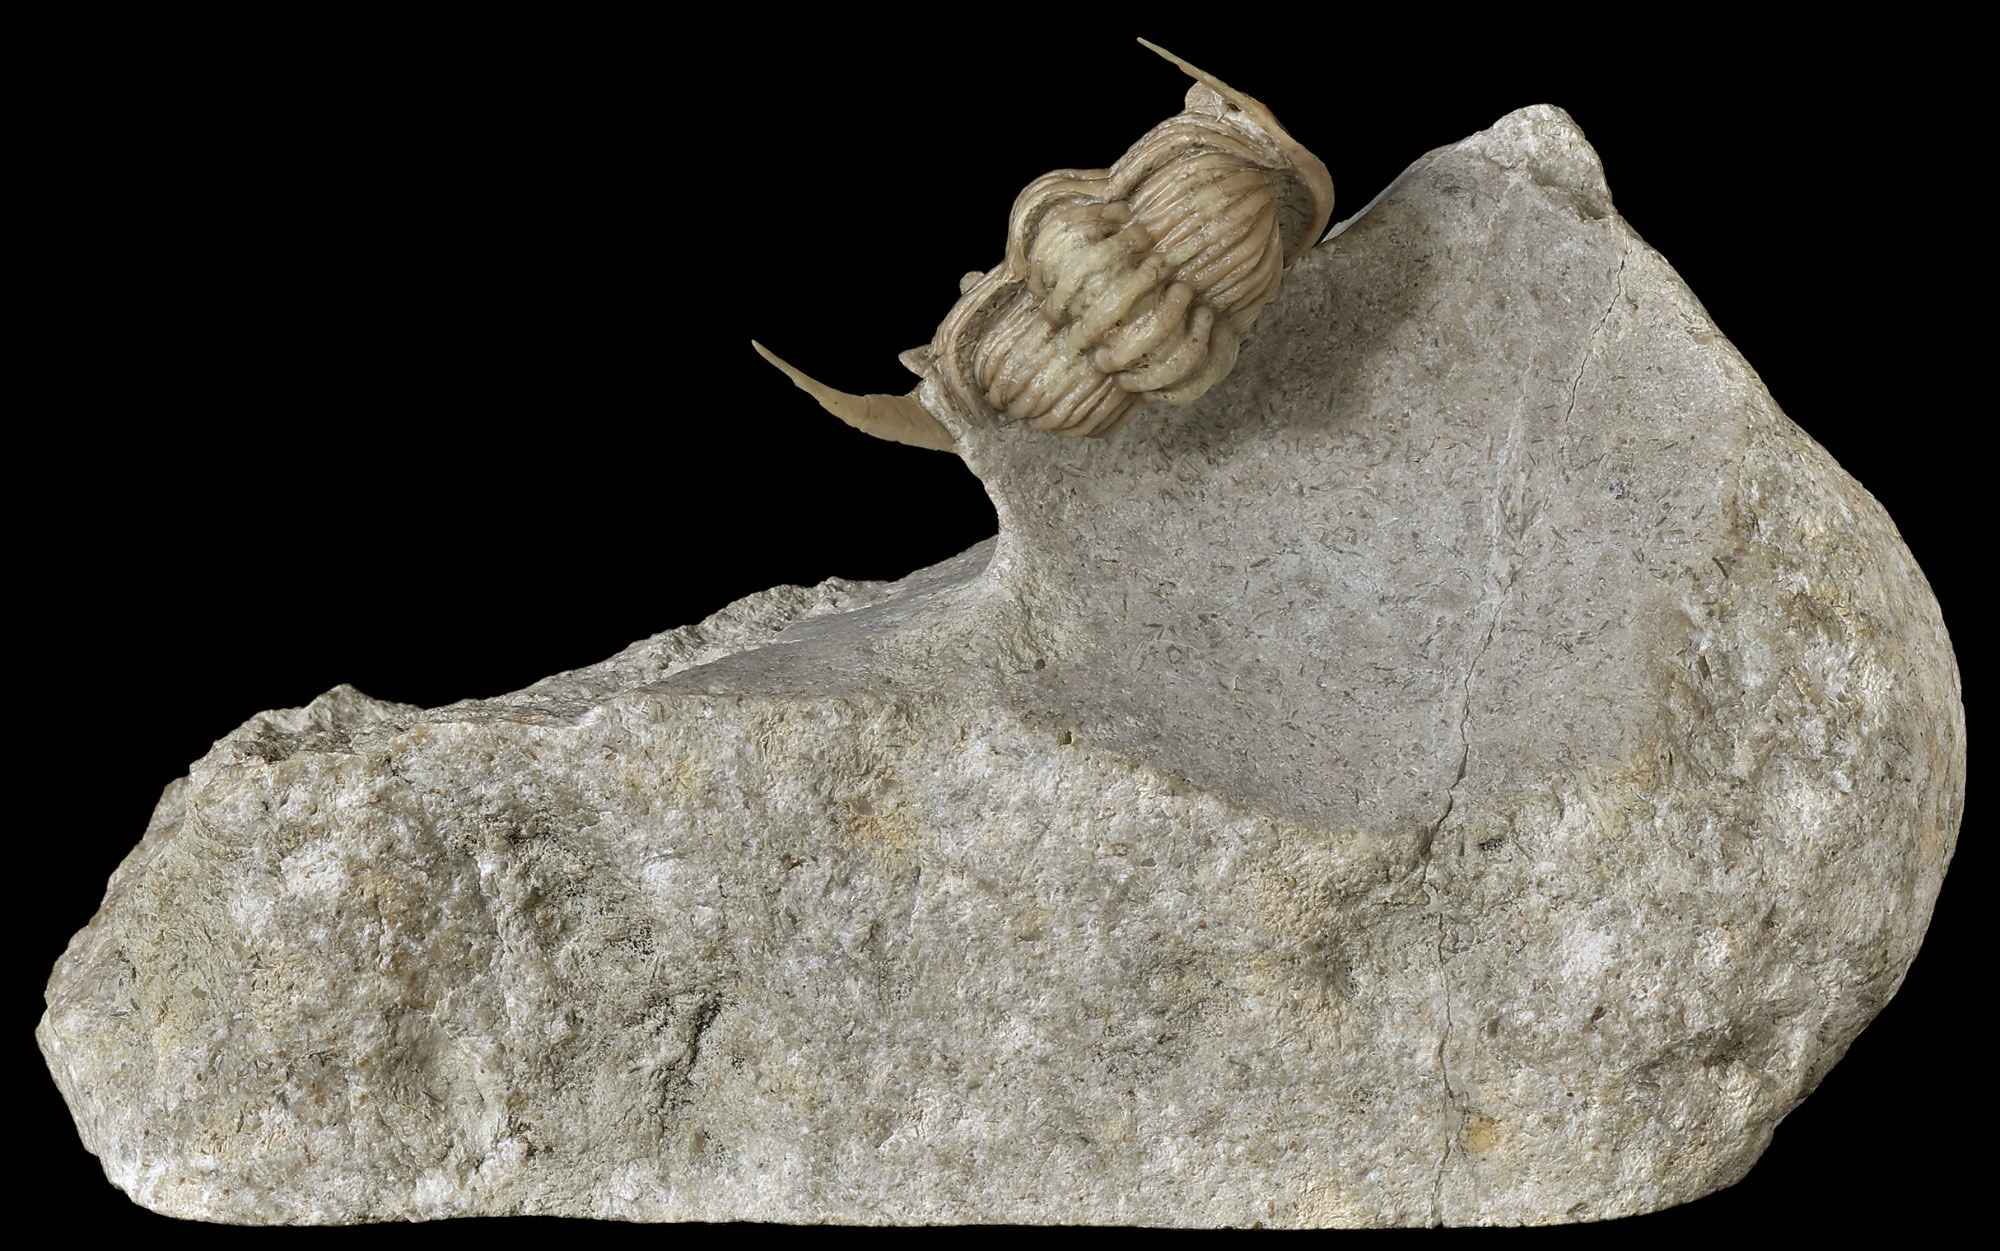
Fig. 26: The back side of the specimen. Enlarge photo.
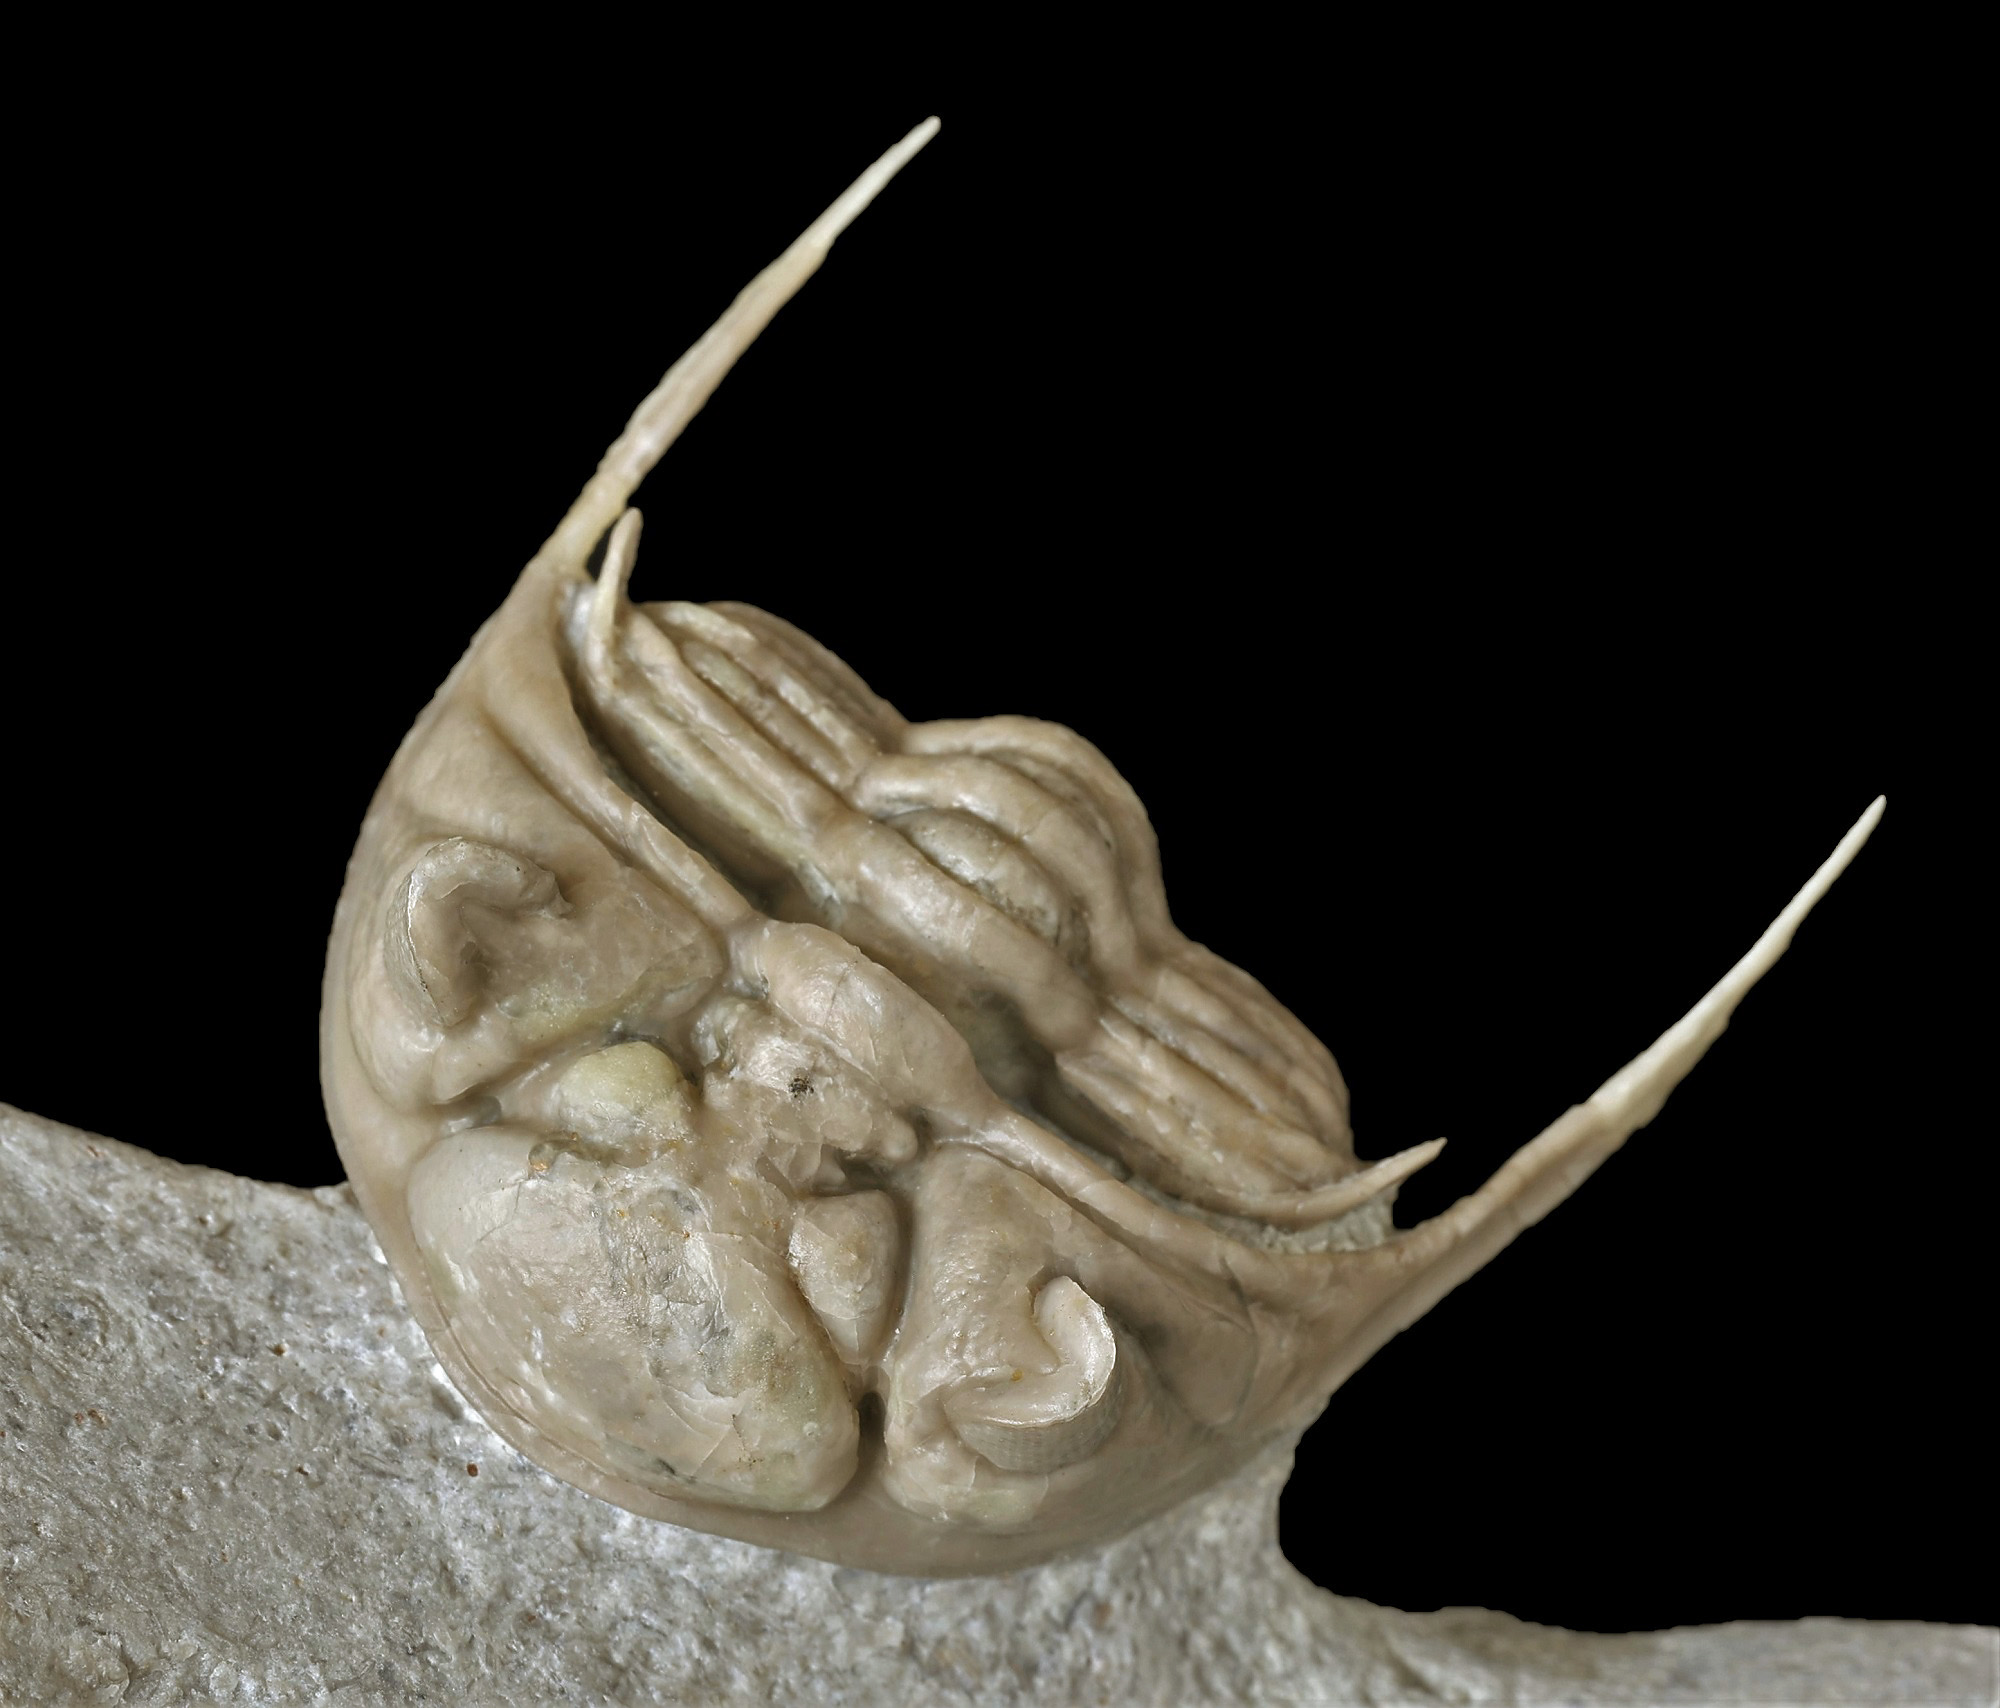

Figs. 27-29: Other views of the Chasmops tallinnensis. Click onto the photos to enlarge them.
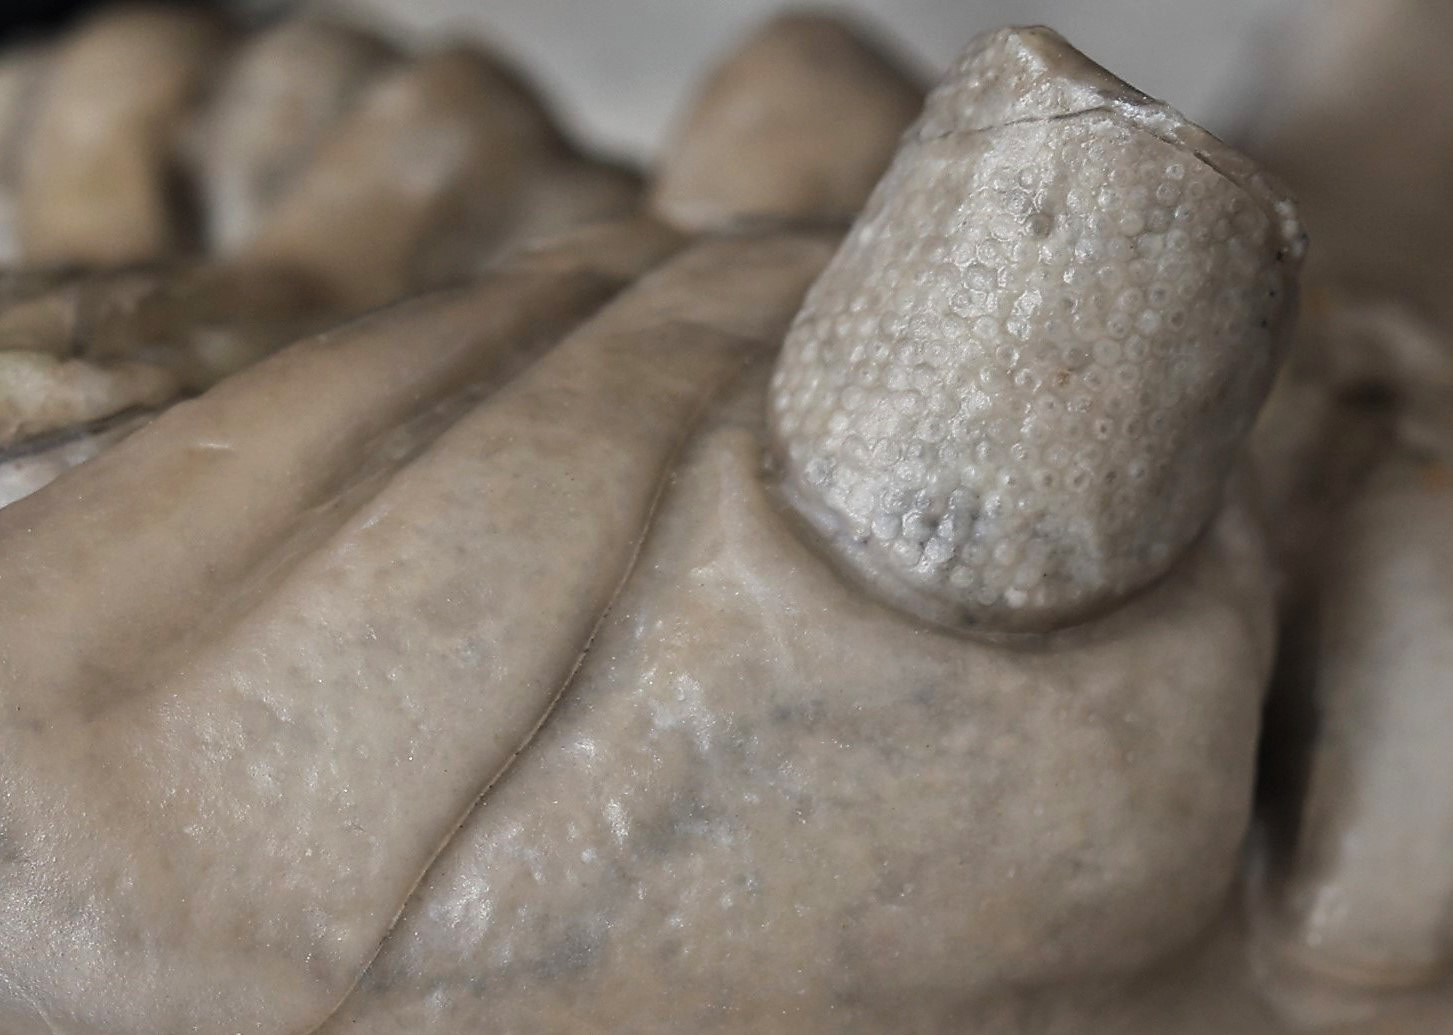
Fig. 30: Detailed view of the right eye. Visible on the lower left side of the shell thanks to light reflection on the low-contrast shell: a very fine tuberculation. Enlarge photo.
The Chasmops is probably a Chasmops tallinnensis. This species has evolved from Chasmops odini odini and cannot always be distinguished with certainty. Hans-Hartmut Krüger describes C. tallinnensis in his work about the Chasmopinae as very rare and the state of preservation as often bad. In addition, the carapaces from the very hard, somewhat lighter colored limestones are very difficult to recover or prepare. These observations are consistent with my experience from the preparation of this piece. Fortunately only one area of the trilobite, especially the rhachis, was poorly preserved. The preparation on the other hand, was very challenging across the entire fossil. The poor separation and the extremely thin and fracture-prone shell were stubborn allies. The result of the work is all the more gratifying: a collection piece that would surely be at the forefront of many trilobite collectors' display cases.
Details of the fossil:
Fossil: Chasmops tallinnensis ÖPIK 1937
Locality: Kreuzfeld near Malente (S-H, Germany), 2019
Formation: Ludibundus limestone (?), Upper Ordovician, Lower Caradoc, Kukruse stage, C2
Width of the cephalon: 3,4 cm
Preparation time: 59 hours
Preparation and photos: Paul Freitag
Collection: Jan Deppermann
Reference:
Krueger, H.-H. (2013): Die Unterfamilie Chasmopinae (Trilobita, Pterygometopidae) aus baltoskandischen Geschieben sowie Baltoskandia und angrenzenden Gebieten, 150 S., Halle (Saale).
Paul Freitag (Steinkern.de)