
Preparation and „surgical procedure“ – a Minicryphaeus giganteus from the Devonian of Morocco


- Details
- Kategorie: English articles
- Veröffentlicht: Freitag, 24. Januar 2020 14:56
- Geschrieben von Paul Freitag
- Zugriffe: 6128
![]() Dieser Artikel ist auch in deutscher Sprache verfügbar. Jetzt zur deutschsprachigen Version wechseln.
Dieser Artikel ist auch in deutscher Sprache verfügbar. Jetzt zur deutschsprachigen Version wechseln.
My good friend Colin Teo sent me an unprepared trilobite and asked me to prepare it for him. It was a Minicryphaeus giganteus from the Pragian of the Ihandar formation of Morocco.
Mostly these trilobites are quite challenging to prepare, as the matrix tends to cling to the shell rather heavily and can be pretty tough, so that you rarely end up with a satisfactory result.
This species furthermore features a lanceolate appendage, which can add further character to each specimen. That is why we were both highly interested in achieving a result as good as possible under the given circumstances.
Before the preparation:
It was quite clear from the start that the piece had a lot of potential (fig. 1).

Fig. 1: Before of the beginning of the preparation: The broken pieces of rock containing the unprepared trilobite match almost perfectly.
The stone was broken into three main pieces, while the tip of the pygidium was located in a smaller shard (fig. 2).

Fig. 2: The pygidium was already discernible. The tip was located in the smaller piece of matrix and fortunately complete.
Because of the two cross sections it was easy to discern that we were dealing with a big specimen with a thick shell, which would most likely lie perfectly prone within the stone (fig. 3-4).

Fig. 3: A cross-section of the hind part of the trilobite. You can see a part of the pygidium, as well as the two following pleurae. The pygidium is not disarticulated, but lies quite close to the pleurae – off to a good start!

Fig. 4: The front cross-section shows just the cephalon. A part of the left eye is visible, while the appendage of the front edge is not.
The first 1-2 cm of rock closest to the surface of the stone were quite weathered, promising a quick preparation progress in this area.
The cephalon and pygidium were very close to the top outer edge. The appendage was not yet visible, which nourished our hope for a completely preserved specimen.
The preparation
To make sure whether the appendage was in the correct spot, we decided to carefully search for it. Because the front outer part of the stone was heavily weathered, the search went without any problems. Blasting carefully with low pressure (<0.5 bar) and a rather large distance to the object, it was possible to remove the covering rock in the area where I suspected the appendage to be located.
To our dismay, I discovered the appendage quickly, but unfortunately not in the way Colin and I were hoping for (fig. 5).

Fig. 5: The started preparation on the appendage. Where is the missing piece?
The tip of the appendage was partly not within the stone, but there were tiny shards of weathered rock in the packaging of the trilobite which had gotten loose during the transport. Luckily I always keep these pieces, although they can mostly be discarded after the preparation was done successfully, because they are usually just chipped off pieces of matrix. In this case however keeping the bits was our rescue: After a closer inspection of the shards, the missing piece was found (fig. 6)!

Fig. 6: If you wouldn´t know what you’re looking for, the tiny, oval-shaped cross-section of the tip wouldn´t catch your eye.
Because parts of the stone were broken off and destroyed during transport, the missing piece fitted with only one small edge onto the main matrix. If the shard would have split along other cracks, the tip would probably have been lost for good.
After reducing the matrix of the broken piece I was able to glue it successfully, so its preparation could be started (fig. 7).

Fig. 7: After a few minutes of blasting, the magnificent shell preservation of the appendage with its strong tuberculation became visible.
After a short while of air abrading, it became clear that the tip was bent upwards in an unusual way. The frontal area was split up in different parts and deposited with a slight offset; a circumstance that became important later on (fig. 8).

Fig. 8: The appendage unexpectedly showed an unusually strong upward curvature.
Whilst dealing with the cephalon, first preparation steps were done at the pygidium as well. A tiny window in the matrix was opened. I was able to locate the tip of the pygidium in the opposite piece, so it was possible to reattach it easily later on (fig. 9).

Fig. 9: The part of the pygidium protruding from the main stone was blasted and showed a good preservation.
Because it was in Colins interest to discern early whether the Minicryphaeus would actually turn out to be almost perfect or not, we decided to clear a small part from the head down to the pygidium in the next step.
Doing this we could easily check if anything was disarticulated. So I worked downwards from the appendage to the cranidium. We discovered another bigger offset, because of which the appendage was bent downwards, before bending upwards again (fig. 10).

Fig. 10: A clear cleft separates appendage and cephalon.
To get a better grip on the exact position of the cephalon in the matrix the preparation work was continued at the right side. Step by step I carefully worked on the outer edge with air abrader and air scribe (fig. 11).

Fig. 11: The outer rim of the cephalon shows an exquisite preservation.
From time to time the rocks were matched to check for the orientation of the trilobite shell in the matrix (fig. 12).

Fig. 12: Slowly, but surely the cephalon became exposed.
The work continued along the glabella on to the rear part of the edge of the head, which centrically ends in a small spike. For trilobite preparation it is necessary to make yourself familiar with the morphology beforehand or you are running the risk of damaging special features of the shell, like the tiny neck-spine. To our great joy two pleurae showed up near the head, which made us hopeful for the continued process (fig. 13).

Fig. 13: Uncovered central part of the cephalon and the first pleurae.
Pleura by pleura the preparation continued towards the pygidium. Nearing the pygidium the work became noticeably more difficult, because the pygidium was deeply set in rather hard stone.
The stone barely separated from the shell by chiseling, so careful blasting was necessary to preserve the ornamentation of the shell surface (fig. 14).

Fig. 14: The rachis runs completely straight – just what a collector likes to see!
At this point the stone was assembled again to work out how to proceed best (fig. 15).

Fig. 15: The Minicryphaeus is almost perfectly centred in the rock!
In the end it was decided to “adjust” the appendage. This task would be one of the last steps to balance out the reconstruction in relation to the entire specimen. So the trilobite had to be uncovered completely and the matrix to be brought into shape. Because I had already cleared a small window on the right side of the trilobite, I continued there with further preparation work (fig. 16).

Fig. 16: The preparation work was continued on the right side of the trilobite.
Following the pleurae I worked step by step towards the tips. A fine tuberculation of the shell and the formation of small knots at the edges became discernible (fig. 17).

Fig. 17 a & b: Step by step the work continued.
Meanwhile the tip of the pygidium was glued and carefully abraded (fig. 18).

Fig. 18: The reattached tip of the pygidium. In this photo it becomes obvious, that just a few millimeters saved it from erosion.
On the left I prepared alongside the genal spine. Thereby the fragile eye lenses were left covered by matrix in order to keep them sheltered and undamaged. In most cases it is best to leave the eyes covered until the final preparation steps (fig. 19).

Fig. 19: The left cheek becomes more and more visible.
Because the middle part of the trilobite was positioned more deeply in the stone, especially on the left side, a lot of matrix needed to be removed. If possible, I always leave as much natural stone as possible around the fossil. I only smooth out the area that directly surrounds the trilobite where it is impossible to avoid touching the embedding rock with the chisel during the preparation of the fossil. Keeping as much rock as possible untouched contributes to a result that looks quite natural. Through massive preparation work and changes the natural character of each fossil that is based on matrix can easily become lost and the result may look somewhat artificial. Luckily in this case there was enough matrix present to achieve a pleasing natural shape (fig. 20).

Fig. 20: Intermediate stage of the preparation: There was still a lot of matrix on the left side of the trilobite that needed to be removed.
The preparation progressed further, utilising air scribe and air abrader (fig. 21-22).

Fig. 21: Meanwhile, the work at the pygidium was almost finished.

Fig. 22: Steady and surely the preparation work continued.
To our great surprise we discovered a pathology on the left side of the trilobite. The first pleurae are a lot shorter compared to those that follow. These kinds of deviations always make the fossil even more unique and special (fig. 23).

Fig. 23: Pathological first two pleurae on the left. Notice the little knots on the back edges of the pleurae!
In the next step the pieces were glued together. While preparing I always keep a small amount of rock along the break lines before the glueing happens to avoid spalling and loss of fossil substance along the lines. Coloured epoxy-resin glue was used to glue the pieces together and fill up the gaps and frayed break lines. Furthermore a base had to be created (fig. 24).

Fig. 24: The assembled piece after the glue had hardended. After having decided for a suitable display position, that would yield a harmonic overall appearance, a stand was defined.
Before starting the reconstruction work, I had to remove and smooth out the final pieces of matrix (fig. 25, 26).

Fig. 25: The rest of the matrix was cleared away – starting with the rows of stone next to the points that were glued.

Fig. 26: After smoothing out the matrix the trilobite looked already quite nice. Sprayed with alcohol it showed the shell details best under grazing light. Click here to enlarge the photo.
There were two major fields of reconstruction: For one, small gaps needed to be filled up in the matrix to create a pleasing general impression (fig. 27). Therefore Apoxie Sculpt was mixed with stone powder and applied after the preparation.

Fig. 27: The gaps in the matrix needed to be filled.
Additionally we decided, that the already mentioned appendage needed a “rearticulation”. Therefore it was necessary to dismantle the appendage, take it apart at the drifted breakages, clean every part and then reassemble it (fig. 28). Because the appendage was slightly inclined in the stone some matrix material would be needed to fill the gap, as we didn´t intend to display it free-standing. Some collectors prefer it that way, but Colin and I decided in favour of a more “natural” look, presenting it surrounded by reconstructed matrix. That way it is much more stable, which is especially relevant during transport.

Fig. 28: The fragmented appendage before the process of dismantling: marked are the break lines where I needed to adjust the pieces after removing them from the matrix.
The „surgical procedure“
The dismantling of the appendage seemed to be the least of issues in this case. On the side, right under the shell as much matrix as necessary was removed in order to extract the appendage from the cephalon. It was carefully blasted and scratched to preserve the fine granulation of the shell and to prevent it from breaking. The appendage was extracted piece by piece in finally four parts.
I carefully cleaned each isolated part. It is extremely important to only abrade with low pressure, as otherwise the break lines could be damaged too much to be able to properly glue the pieces back together later on. The process became really challenging when working on the tip. Another cleft needed to be opened, which took a lot of careful effort, because I needed to handle tiny pieces of fragments of the spine (fig. 29-30).

Fig. 29: The successfully extracted tip still showed a small visible misalignment.
Fig. 30: At the marked line I had to separate the tip into two parts. Then I removed the sediment along the crack and reassembled both parts as there was no other way to get rid of the misalignment.
Alternating between needles and blasting I was able to make small progress at a time (fig. 31).

Fig. 31: Working carefully, the gap could be opened and cleaned.
After the separation the pieces needed to be glued together again. Fully cleaned and glued it nearly looked like it had always been that way (fig. 32, 33).

Fig. 32: The newly assembled appendage. The break lines were grouted later on.

Fig. 33: This was the initial position of the appendage, which is now relocated.
Tentatively the appendage was put next to the cephalon (fig. 34).

Fig. 34: Tentatively assembled, it became obvious that filling up the gap below of it with matrix would be necessary.
This way it became clear how much matrix would be needed to embed the appendage in its anatomical correct position. So I sifted through the preparation garbage for fitting shards of stone that I could use. After a quick search and after having edited the stones, all pieces were ready to be assembled below of and around the appendage (fig. 35).

Fig. 35: The appendage is relocated on the right position now.
Colin was happy about the successful “surgery” on the trilobite and surprised at the same time that the relocating work went that smoothly. His reaction was: „Wow, your´re a trilobite surgeon!“. Indeed, steady hands, patience and skill as well as experience are needed to work with tiny shell pieces like in this case. Although in the end I think that it is more a matter of the personal mindset. Determined by the question of whether a person chooses to commit to this kind of work or not.
As long as the amount of reconstruction stays reasonable and everything is documented, there is not much argueing against doing it – it is simply a matter of the personal taste of the collector.
In the end only a bit of precision work was left to do. This was done utilizing a fine air scribe and extremely careful air abrading (a fine nozzle is essential). After having cleaned the eyes of the trilobite, it was time to remove the matrix that remained in the spaces between the pleurae. This process is documented in a number of pictures. In these photos the trilobite is covered with alcohol. The photos were taken under grazing light in order to show the surface details in the best possible manner (fig. 36-40).


Fig. 36-40: Surface details are best visible under grazing light when the shell is sprayed with alcohol. The final preparation steps that still had to be done, would take some more time and effort, but in my opinion they were well worth it.
After the proper preparation work including the smoothening of the matrix was done, I filled up the already mentioned gaps in the matrix. Then I formed the new base for the appendage (fig. 41, 42).

Fig. 41: Completely uncovered, but still not finished. The spaces in the matrix and…

Fig. 42: …the cleft between the shards of the reconstructed matrix below of the appendage needed to be filled up!
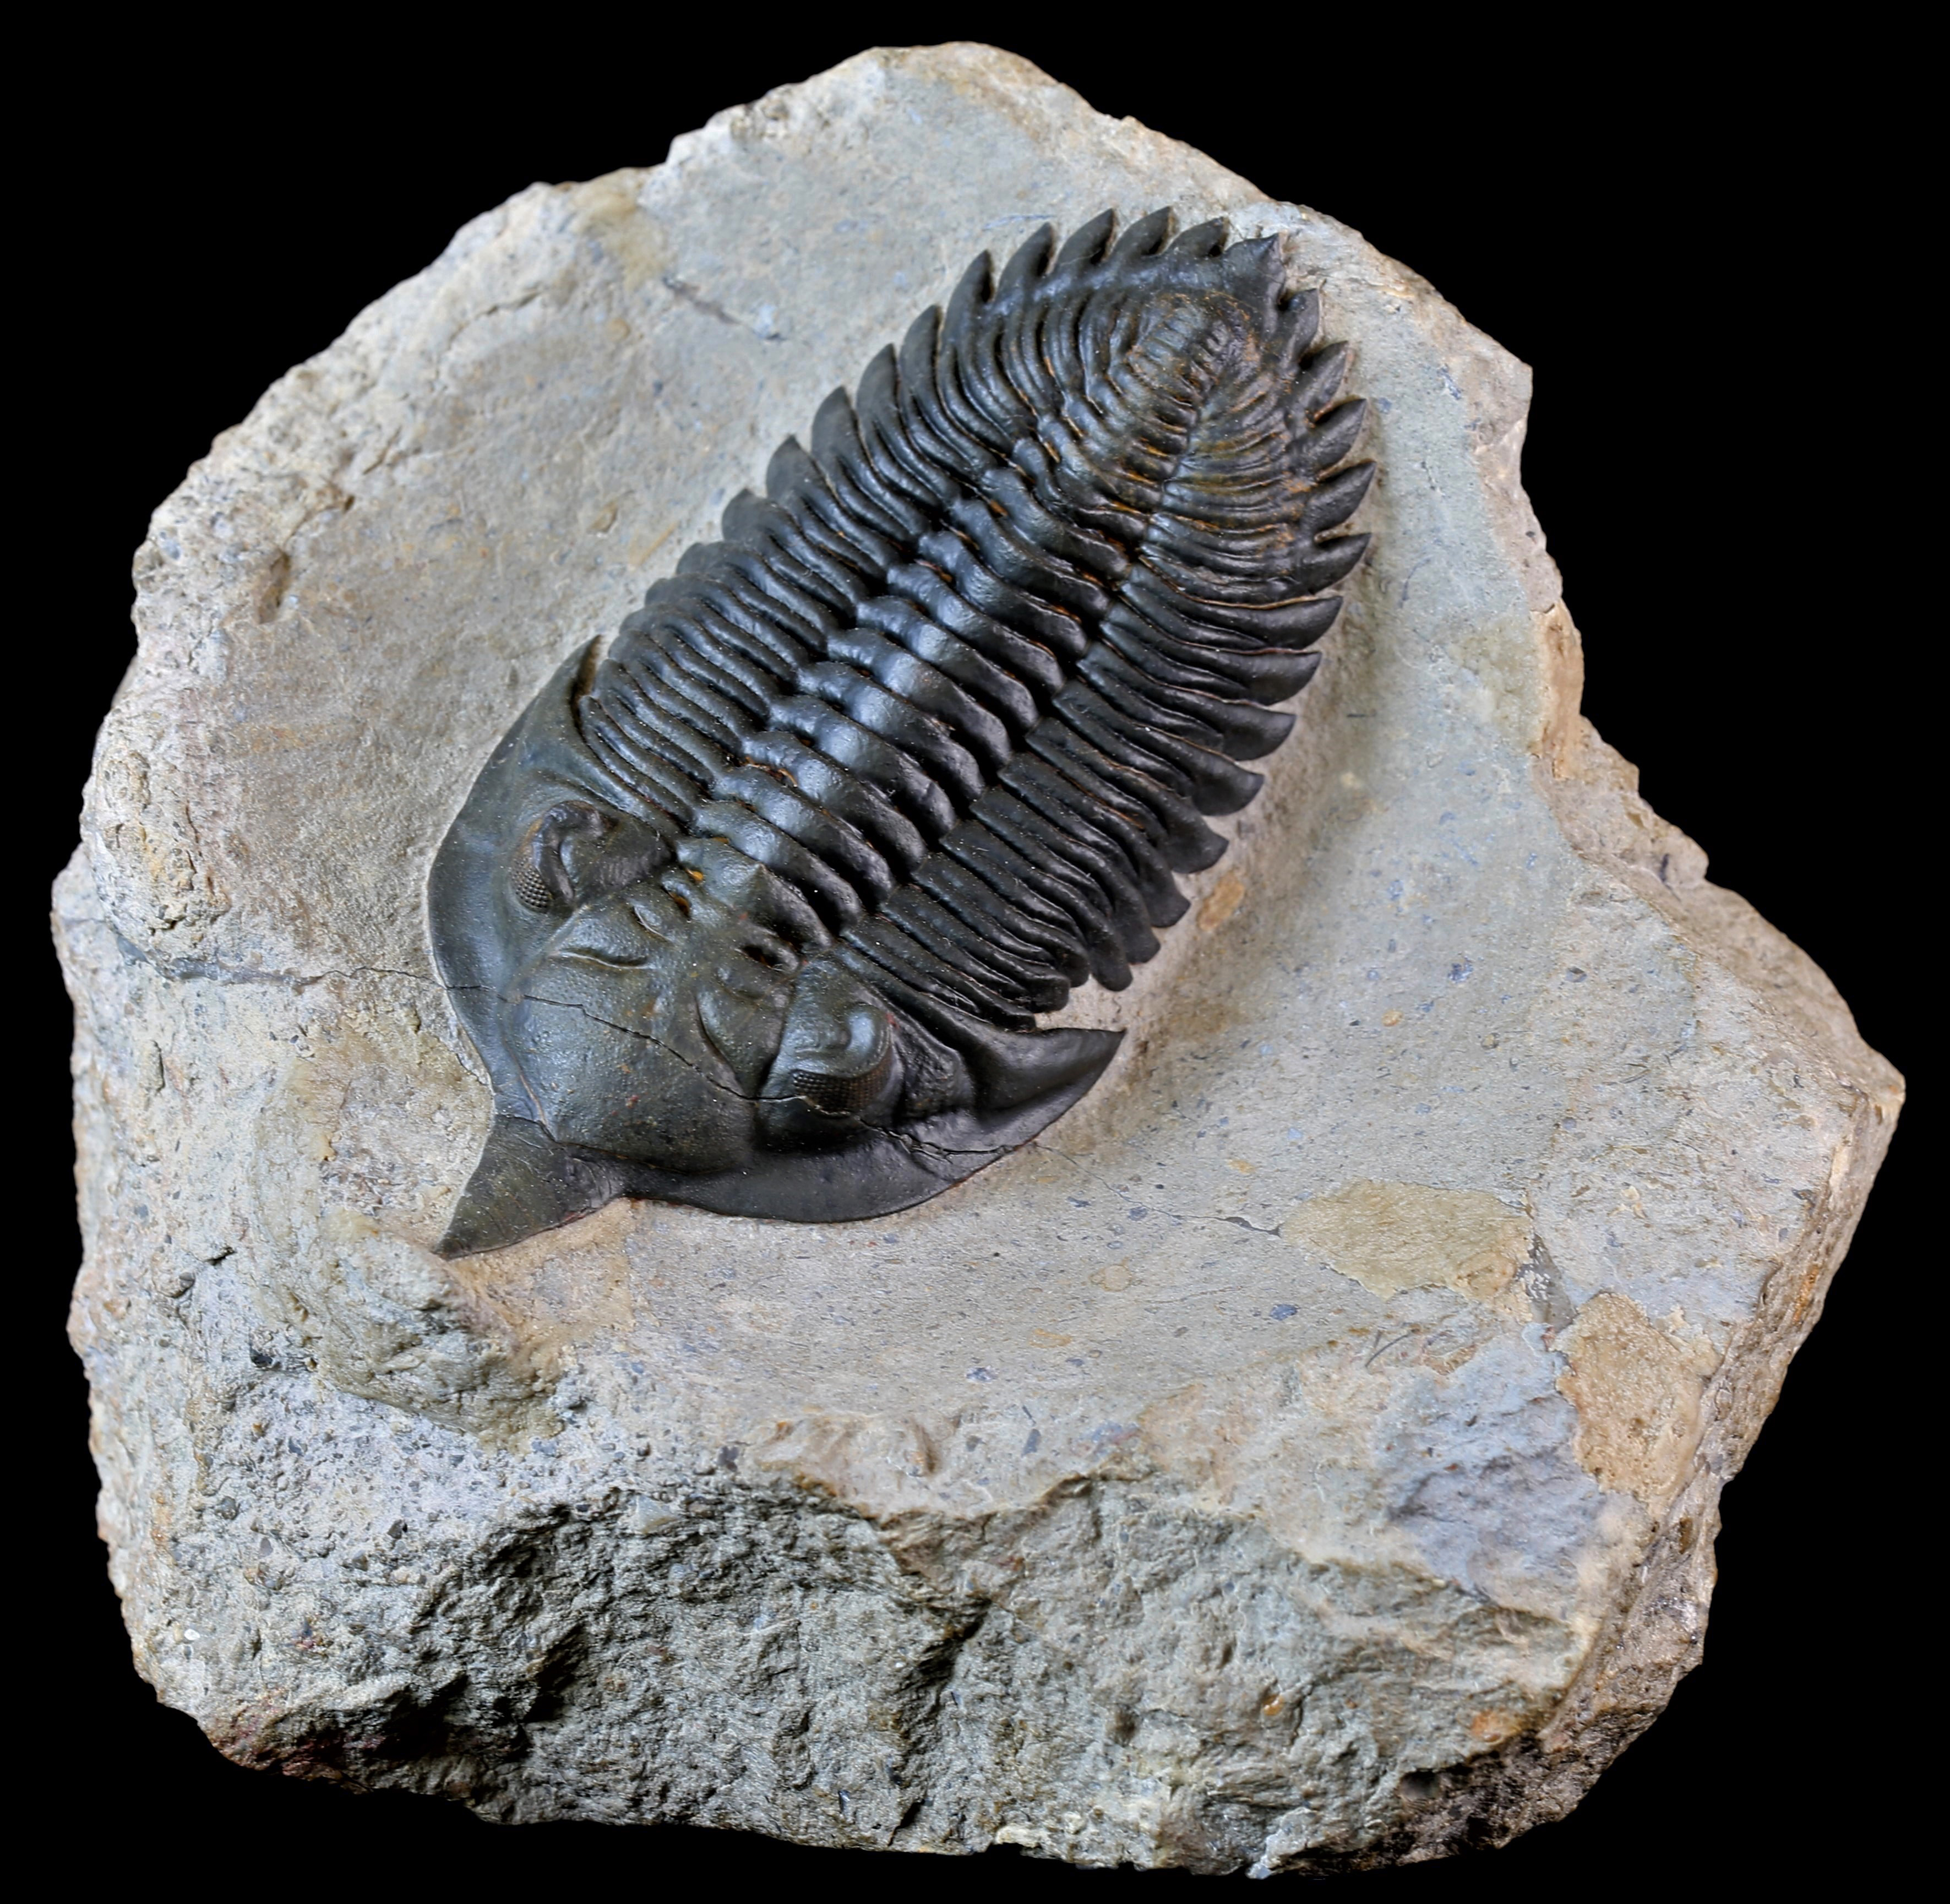
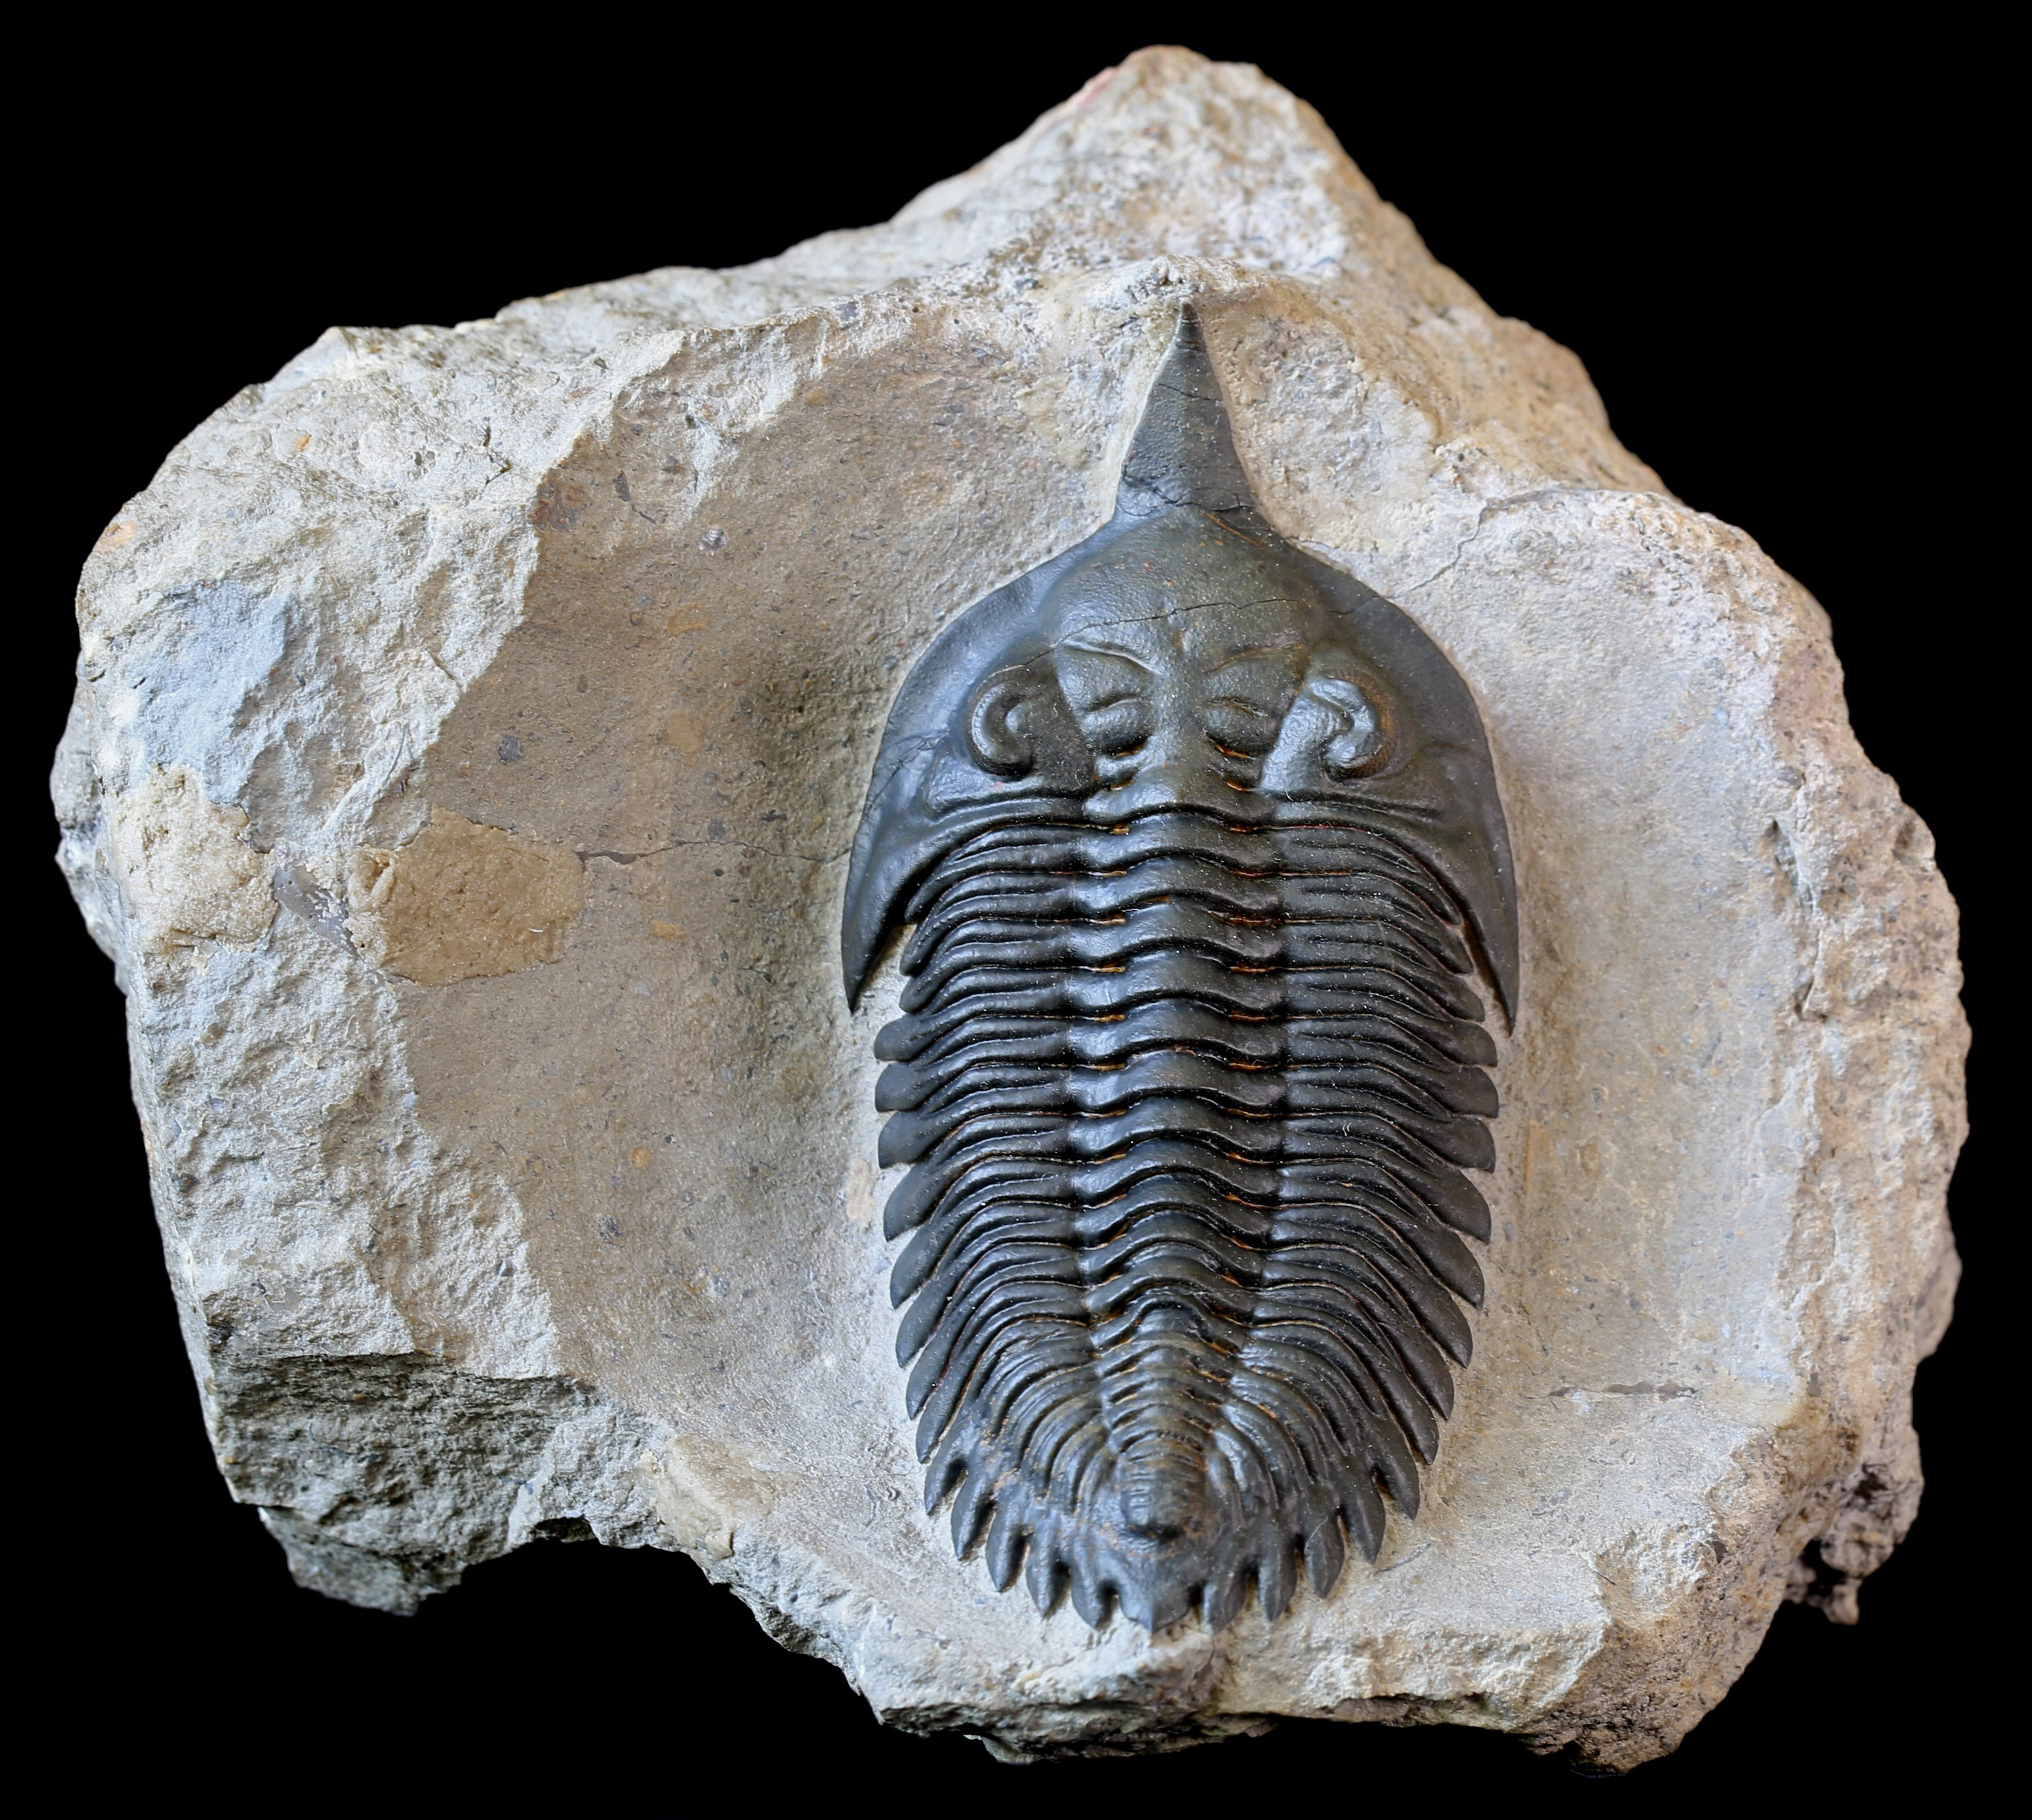
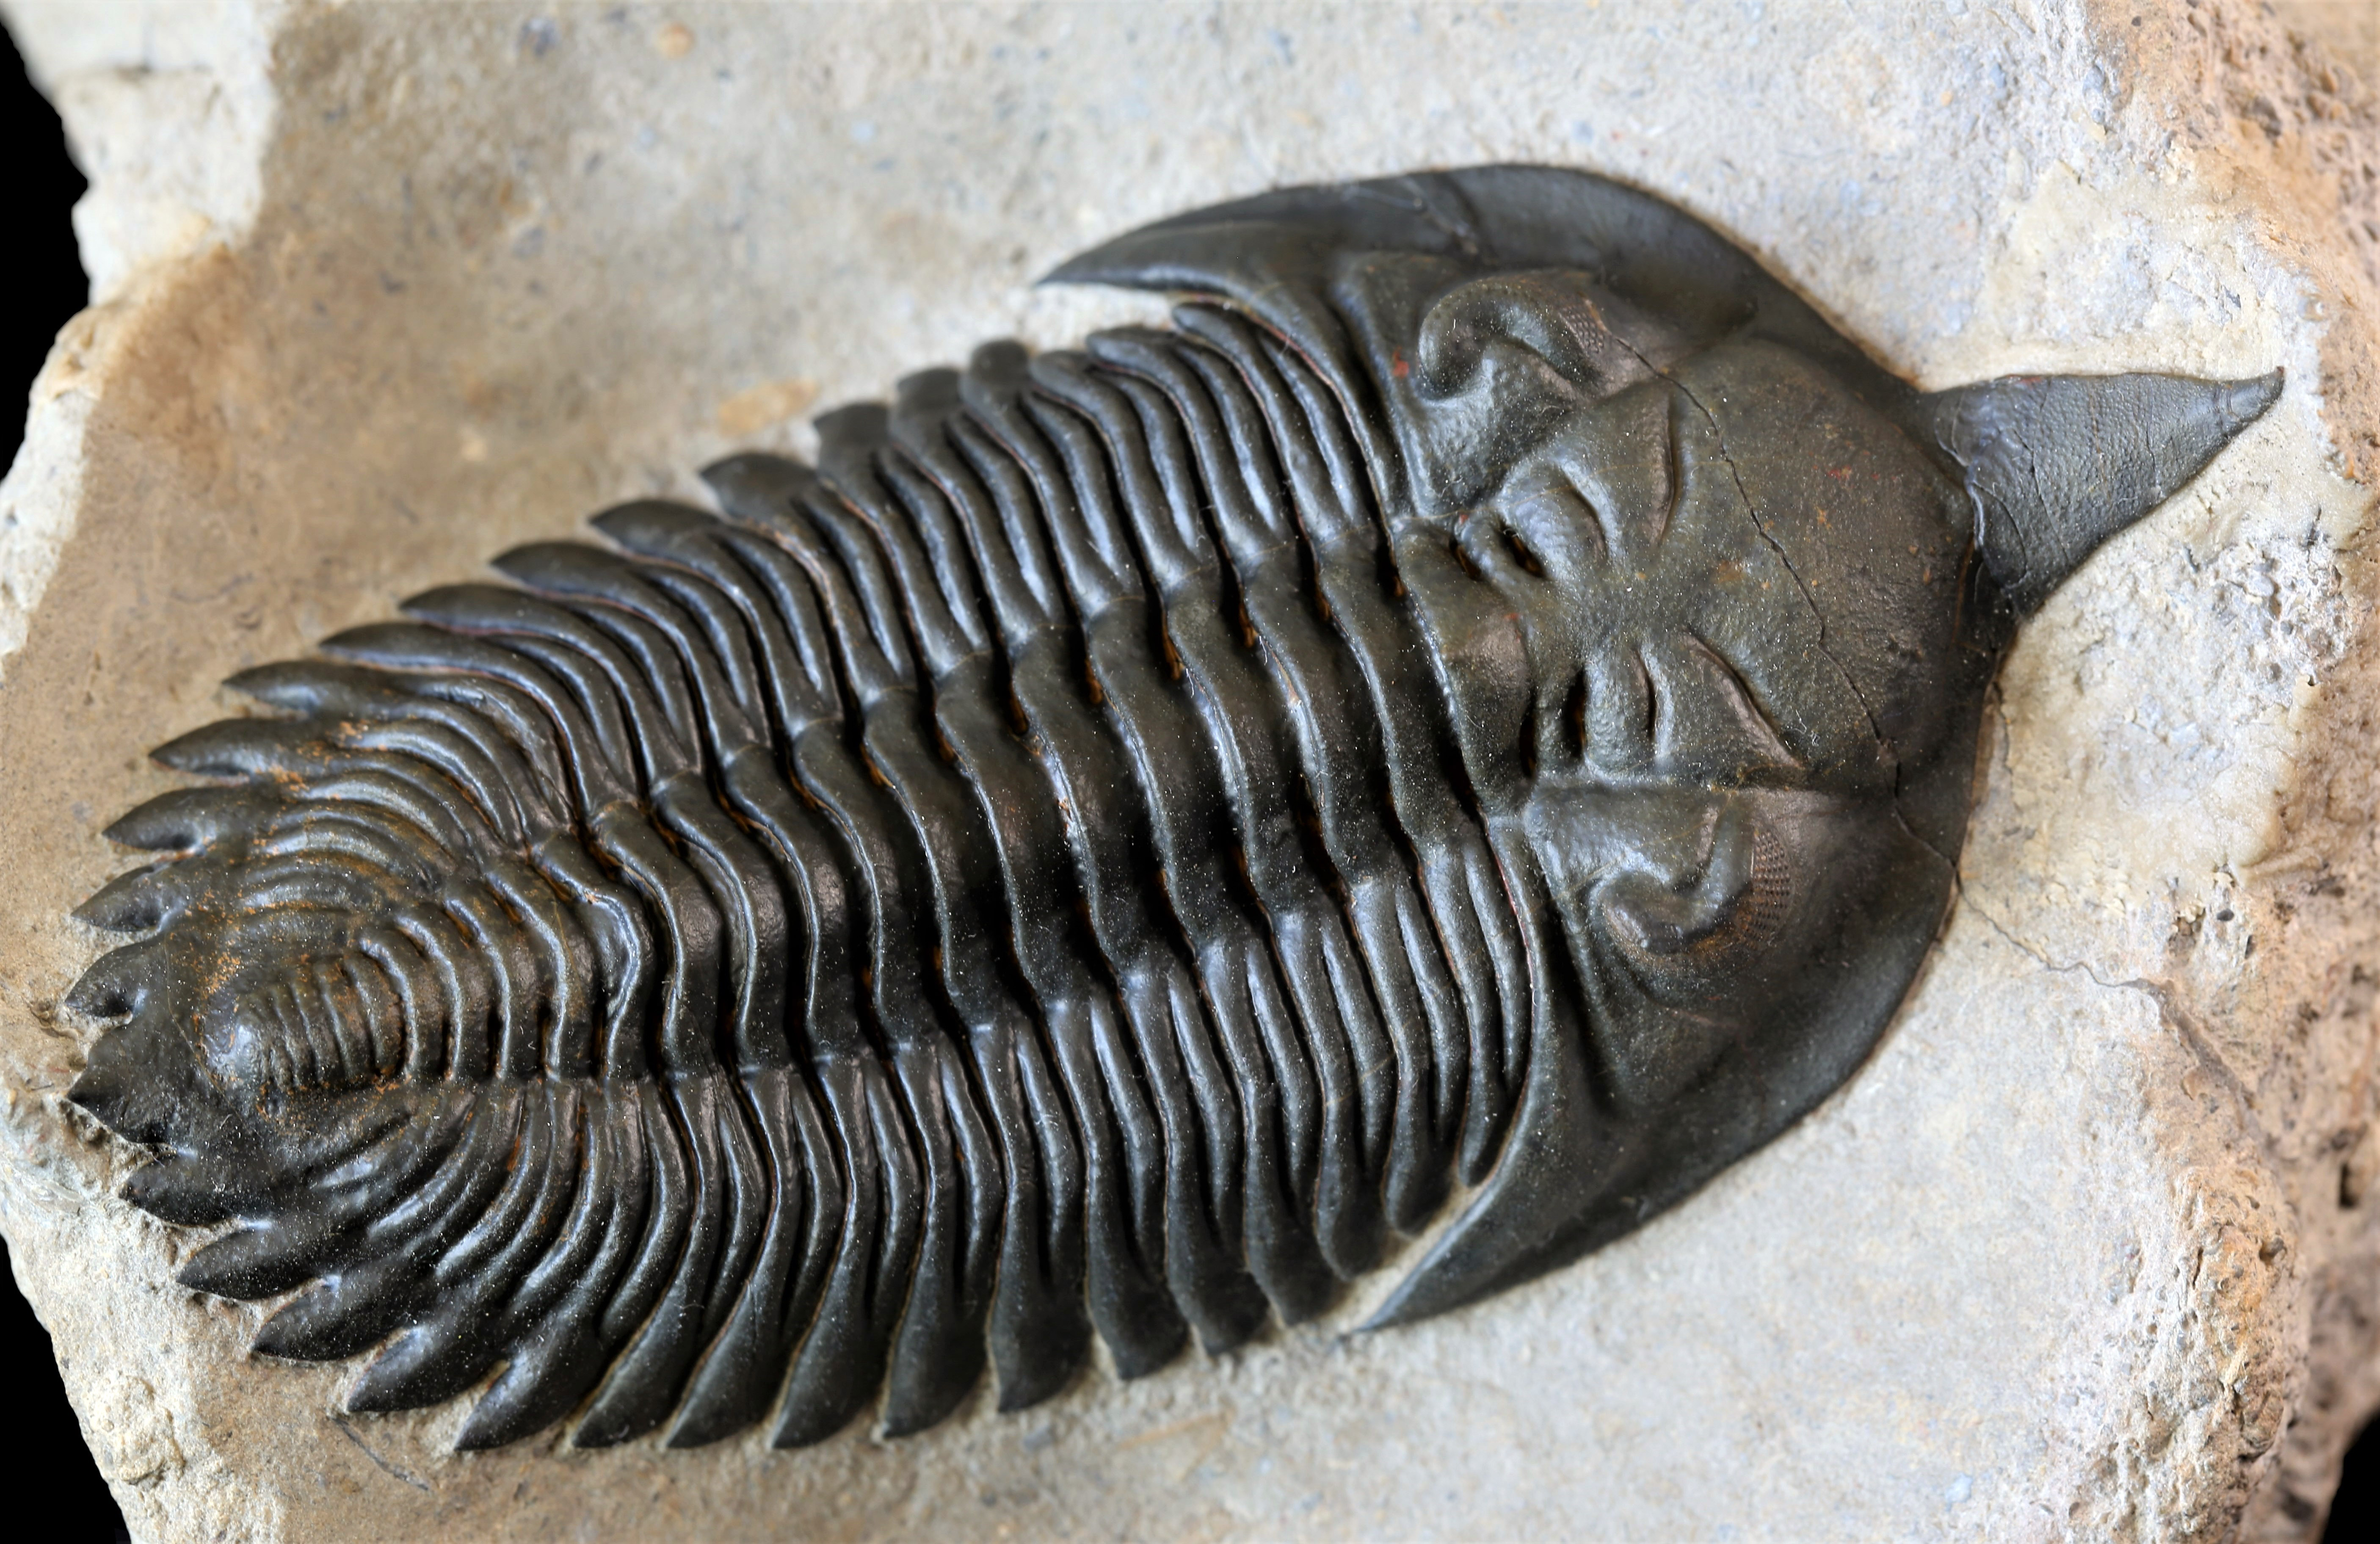
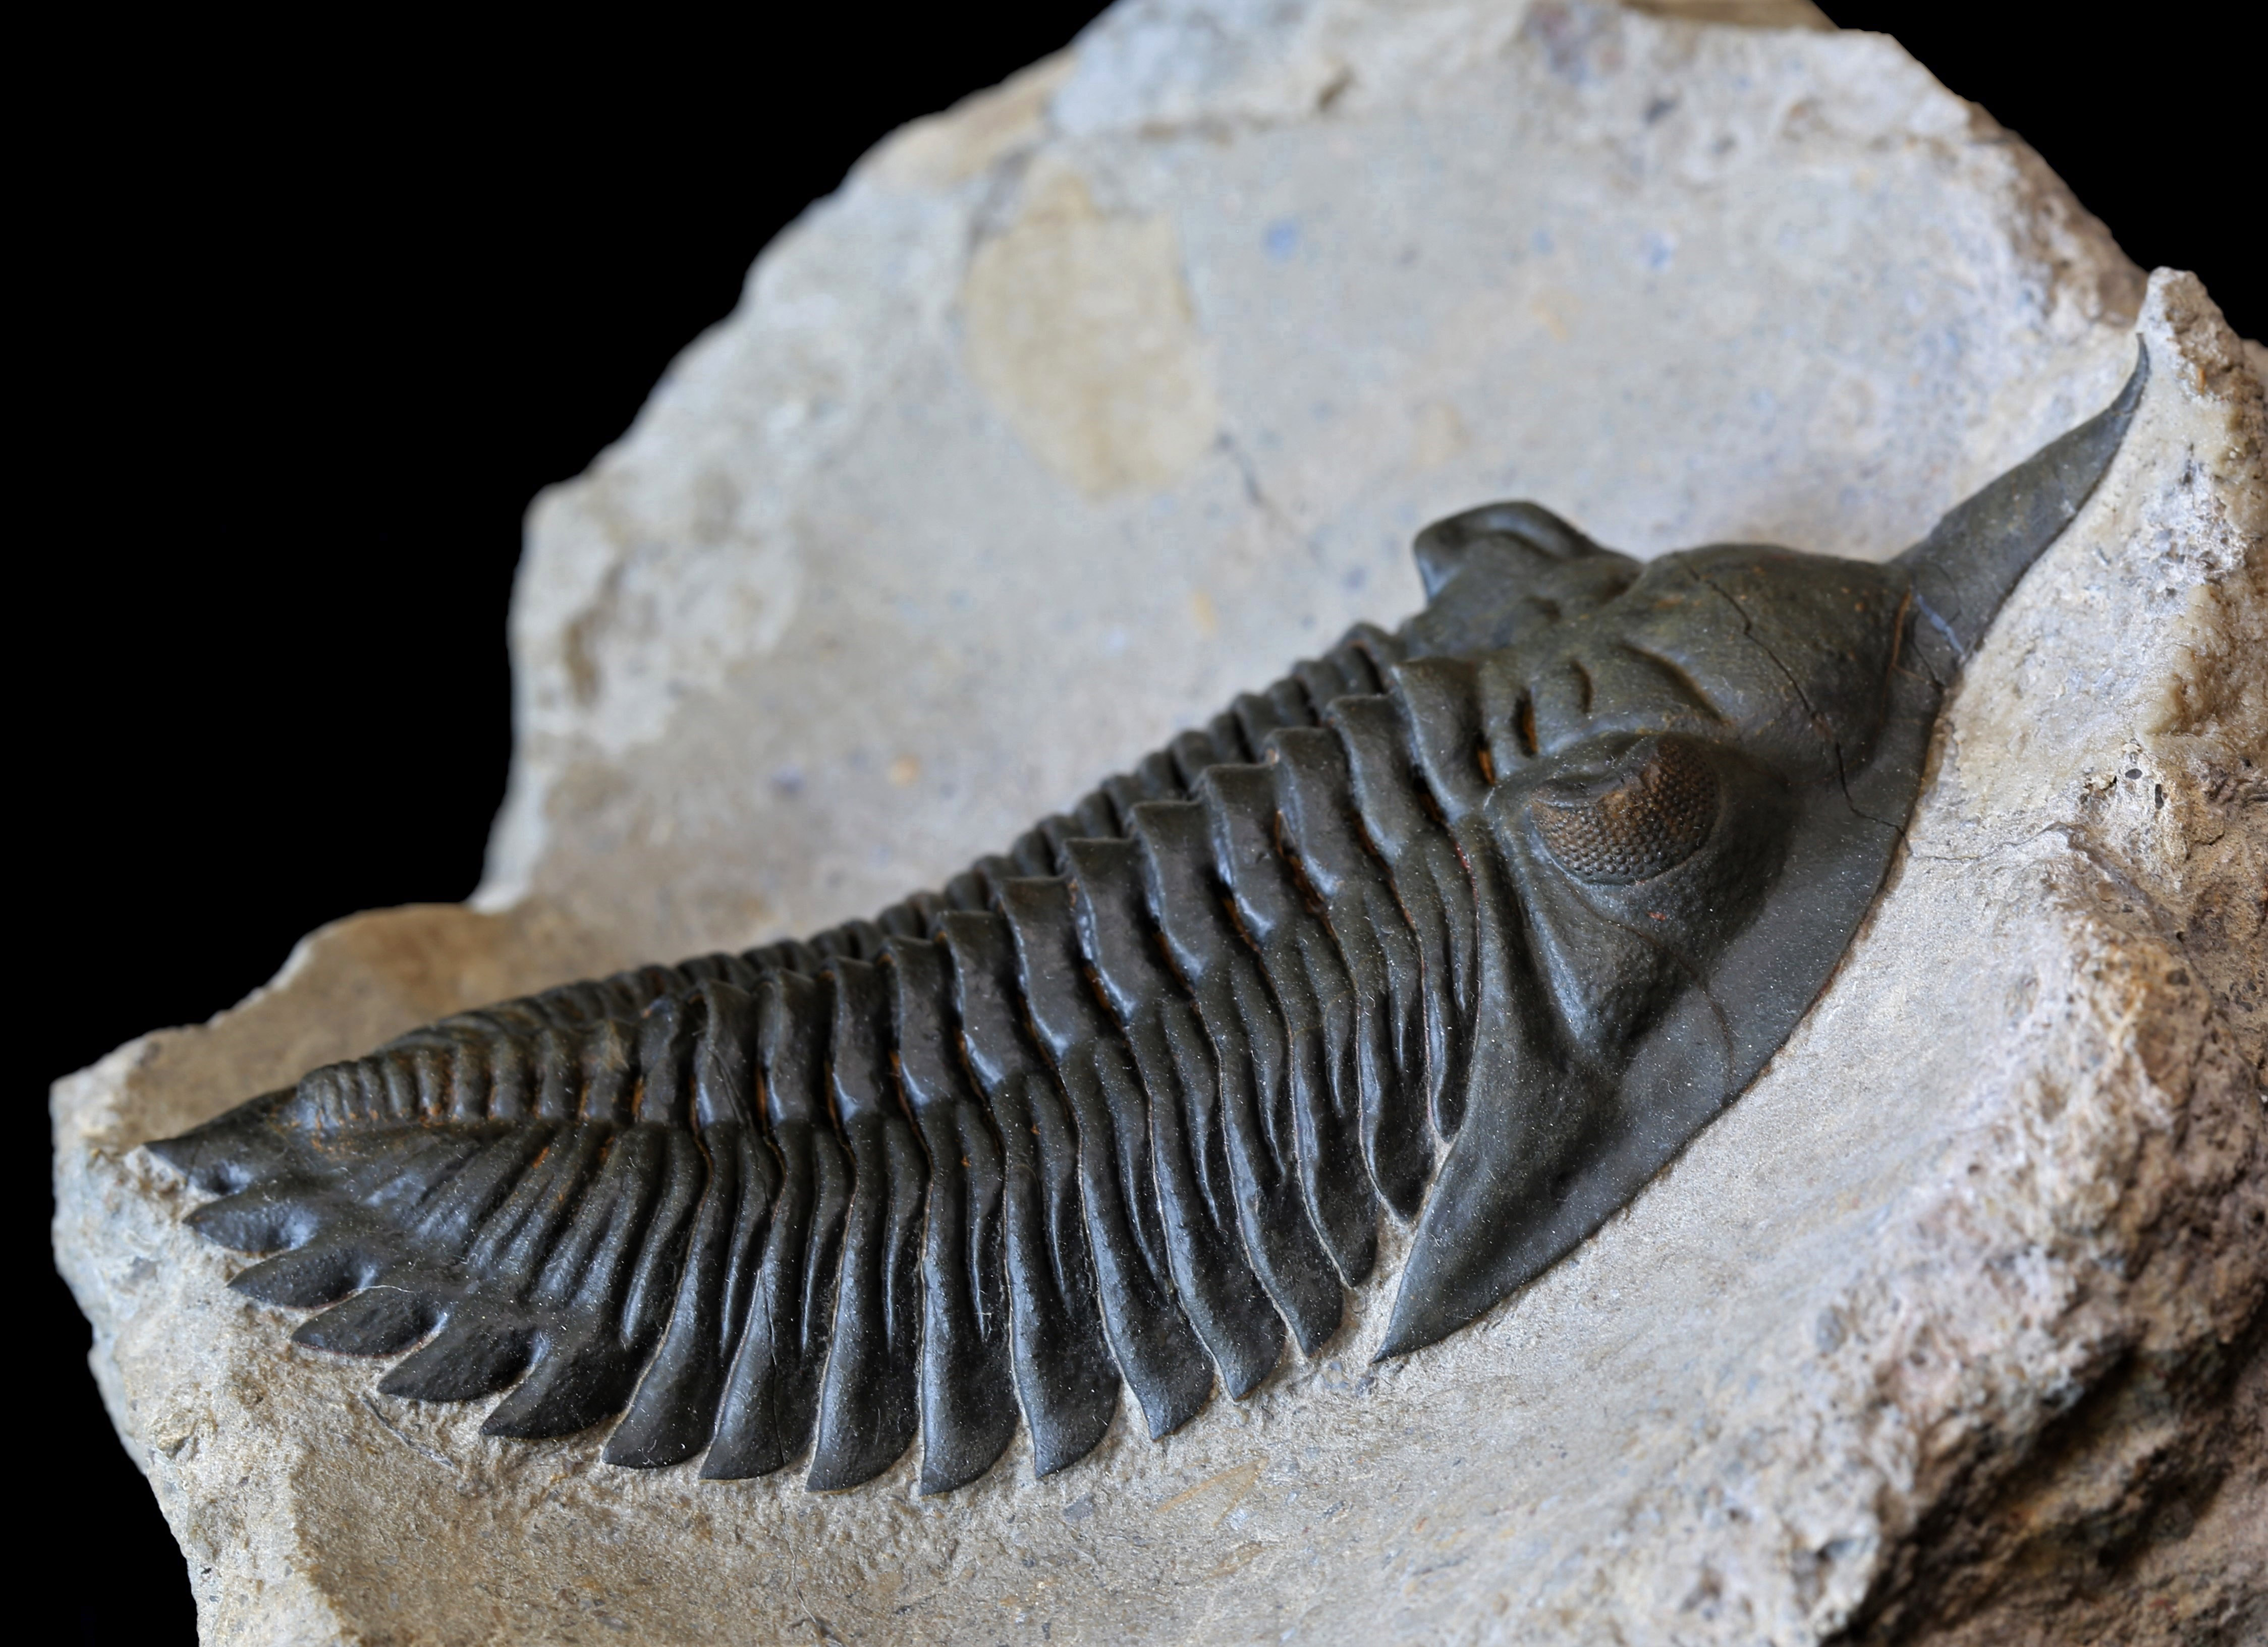
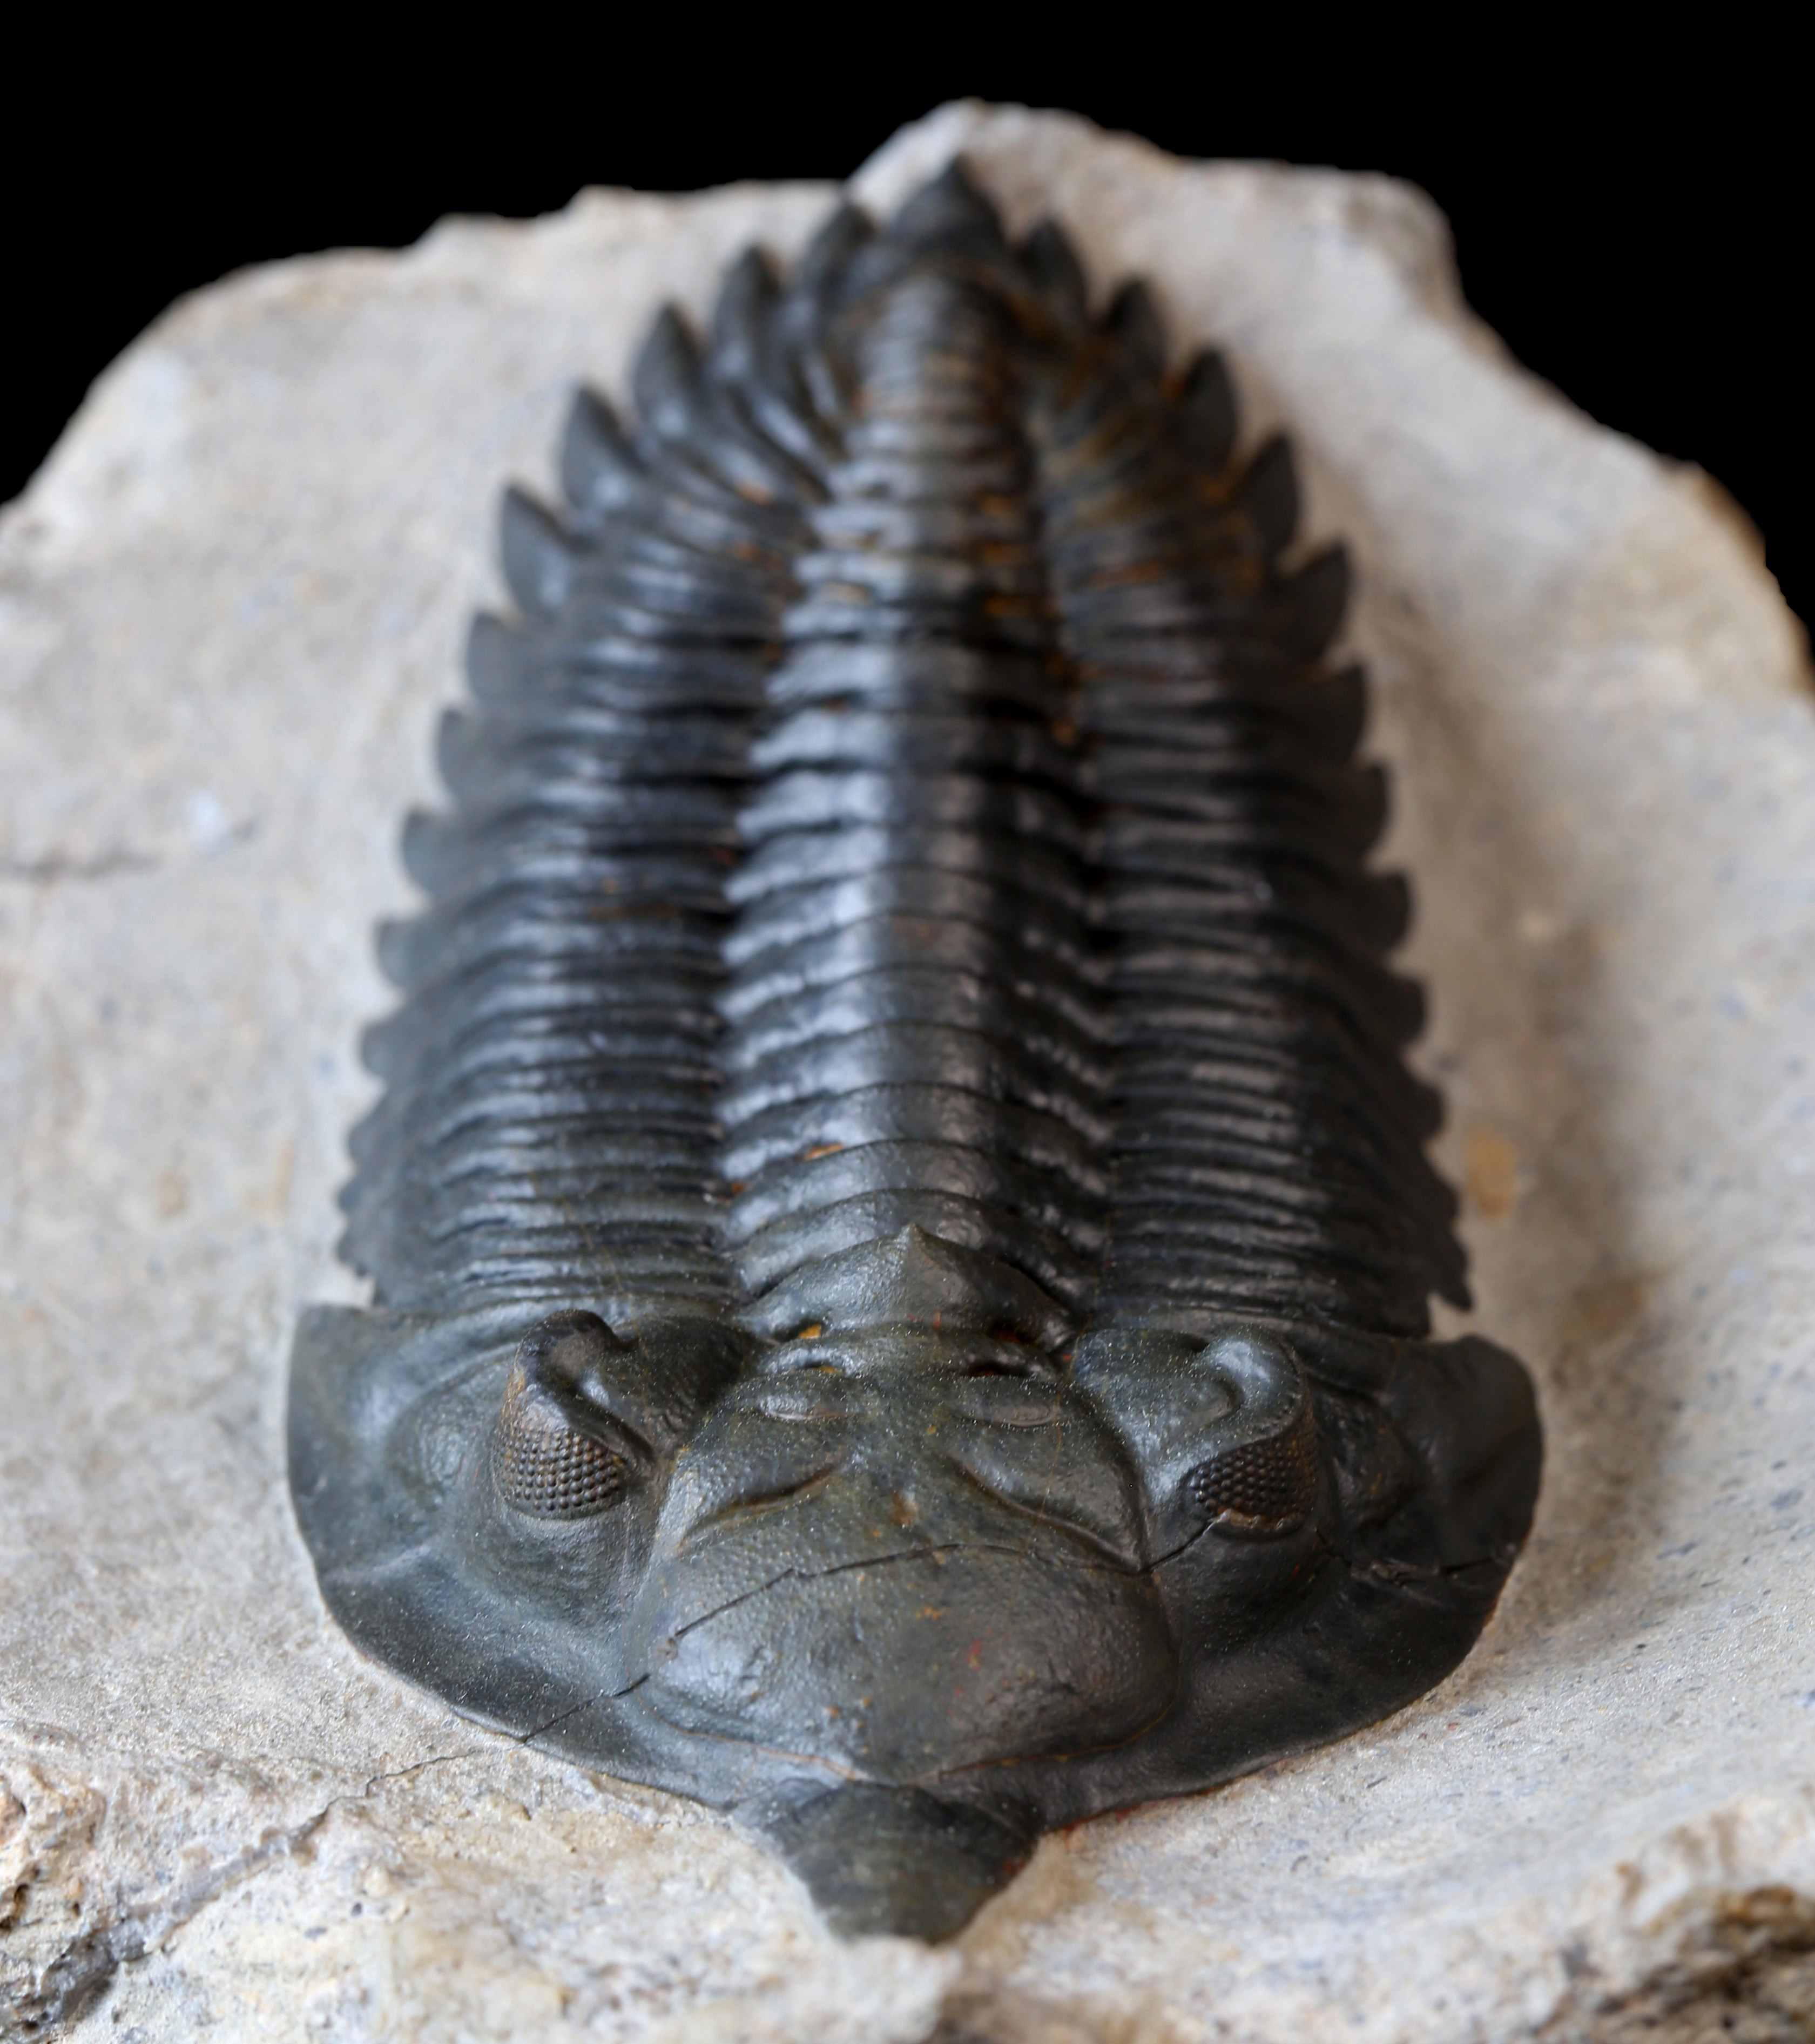
After 34 hours of work the beautiful specimen was finished. It would adorn any fossil collection (fig. 43-49).
Click here to enlarge the photo.
Click here to enlarge the photo.
Click here to enlarge the photo.
Click here to enlarge the photo.

Click here to enlarge the photo.
Click here to enlarge the photo.

Fig. 43-49: The finished specimen from different views.
Luckily many details could be preserved, which are commonly missing in commercial preparations of comparable Minicryphaeus specimens. The fine tubercles of the shell (especially on the cephalon) and the characteristic “knotty” surface of the outside of the pleurae could only be preserved through careful and time-consuming work.
The final preparation result convinces thanks to its natural look. The “surgery” and the restoration of the matrix is not discernible at first sight. The whole piece has a good balance between matrix surface, mass and the size of the trilobite. Sharp edges, caused by the rock splitting, were smoothed so that the main focus is on the trilobite itself. Marks of the preparation process were hidden as best as possible, so that they don´t disturb the overall result. Achieving a balanced combination of a natural look and an aesthetic appearance is not always perfectly possible. Sometimes the stones are simply too small or a significant change of the shape of the matrix is needed to reveal the fossil as much as possible. The happier I am that in this case the goal could be met. The final photo composition in this report showcases a composition of the initial state of the stone and the result of the preparation (fig. 50).

Fig. 50: Putting the initial state and the finished trilobite in comparison shows how the fossil was hidden in the stone. The preparator needs to develop such “x-ray view” or vision of the final product before starting the preparation – it is always an attempt to read fossil and stone. Not everything can be forecast, especially if parts of the fossil are disarticulated, but creating an image of the fossil in your mind by interpreting the visible parts based on anatomical knowledge of the species preserved in the stone as well as experience with comparable earlier preparation projects helps a lot to avoid mistakes during the process of preparation.
Basic information about the specimen:
Fossil: Minicryphaeus giganteus
Location: Jbel Oufaten, near Alnif, Morocco
Formation: Early Devonian, Pragian, Ihandar-formation
Work required: 34 hours
Size: 8,7 cm (about 3,4 inches)
Preparation and pictures: Paul Freitag
Collection: Colin Teo
Photos and report: Paul Freitag, Steinkern.de
Discussion about the article:

